I have been living in the Far North for the last 8 years. I have never (1) had a true hot dish or (2) made a true hot dish. Now, to me a casserole is something like jambalaya or baked ziti or something along those lines. A hot dish (for those not from the Northern part of the US) is a combination of a starch (potatoes - typically of the fried form or macaroni), a vegetable (or another starch like corn that people call a vegetable), a protein (99% of the time it is ground meat), cheese and the all important can of condensed Campbell's soup.
How did I come to make a hot dish tonight? Well, TS had an event to go to tonight and would not be home until late - as in 2 hours after I got home from work. I asked him what he would like for dinner knowing that I had 2 hours to prepare a good meal when he gets home. (Which is another discussion for another day - the whole men getting home and having a hot meal prepared, while the women never get that - or at least I don't). I suggested another of my Mexican cooking challenges, a lasagna (which is NOT a hot dish), or something else that would be more on the "gourmet" side of things. He said, since it has been so cold, and one of his friends posted a hot dish recipe online, he would like that hot dish for dinner. Since I told him he could have anything, I could not really go back on my work, could I?
So, after work today I braved the dropping temperatures (it was a windchill of -9 when I got out of my car) to buy the ingredients for a Southwestern Tatertot Hot Dish. Here is what you need:
INGREDIENTS
1 bag of tatertots
1 can Fiesta Cheese Soup (of the Campbell's condensed variety)
1 can of corn (that "vegetable")
1 can Rotel
1 small can chopped jalepenos
8oz sour cream
1 lb ground meat (I used 93/7)
1 c. shredding colby jack cheese
1/2 tsp salt
1/4 tsp pepper
1 tsp chili powder
1 tsp ground cumin - split
1 tsp dried oregano
1/2 tsp paprika
Now I had some of that at home (mainly the spices), but the rest was bought today. I must admit when it is that cold and windy outside, something hearty like this sounds really good.
While TS was enjoying himself, networking with other lawyers, and braving the weather to get back home, I prepared the meal. (TS takes the bus so he really did "brave the weather")
RECIPE
Preheat oven to 400 and spray a 9x13 baking dish with cooking spray
1. In a skillet brown the ground meat with 1/2 tsp paprika, 1 tsp dried oregano, 1/2 tsp cumin, pinch of salt.
2. Once the meat is browned, take it off the heat to cool a bit.
3. In a large bowl, combine the corn, Rotel, chopped jalepenos, Fiesta Cheese Soup, and sour cream - stirring after each addition.
4. Add 1 tsp chili powder, 1/2 tsp ground cumin, 1/2 tsp salt and 1/4 tsp ground black pepper and mix well.
5. Fold in the frozen Tatertots.
6. Fold in the ground meat.
7. Spread the mixture into prepared 9x13 dish.
8. Sprinkle shredded cheese on top.
9. Bake for 30 mins.
10. Let rest for 5-10 mins and Enjoy!
And I must say, this recipe was the perfect amount of spicy and hearty and warmth to fill us up on a cold, cold night. TS even had 2 helpings! We cannot wait for leftovers tomorrow night. I must say, I now understand why a Southwestern Tatertot Hot Dish is a comfort food for those of us living in the land of below 0 weather.
Note: If you need a vegetable, like I do (thank you dad for always requiring a vegetable with every meal), carrots were a good option.
Note 2: I did a Mexican cooking challenge a few weeks ago that I did not post about. I will update that this weekend.
Wednesday, January 23, 2013

Friday, January 4, 2013
Hello 2013 - Back to the Mexican Cooking Challenge
Now the holidays are over, I can get back to trying new recipes and posting them for you to read. I have even gone back to attempting this Mexican cooking challenge.
I started back on New Years Eve with a guacamole recipe that got the seal of approval from TS's brother Greg-with-two-g's. The guacamole recipe was from my Saveur magazine Mexican cooking challenge. So, part 5 of the challenge was guacamole. I intended to follow the recipe exactly, but part of it got left out in all the rush of New Years Eve. See, I made the guac after a long and hard game of broomball (boot hockey). I had pre-chopped all of the necessary ingredients, put them in Tupperware containers and then brought them to the party. Guac, to me, isn't as good if you make in a few hours in advance. It is one of those foods which must be made when you are ready to eat it. I did not bring the recipe with me, but it was so easy I thought I had it memorized. And - I forgot an ingredient.
My chopped garlic was in a tiny tupperware container (it was only 2 cloves of chopped garlic), and that got left in the bottom of the bag that I brought the rest of the ingredients. Oh well. Now you know, if you leave out the garlic, no one is going to miss it and it will still be an amazing guacamole.
Oh and a I also added an extra avocado since I knew there were going to be a bunch of people eating it.
The real recipe can be found here.
My version of this guacamole:
INGREDIENTS
¼ cup finely chopped white onion
2 tbsp. minced cilantro (I have freeze dried cilantro - so I used that)
4 serrano chiles, stemmed, seeded, and finely chopped
4 ripe avocados, halved, pitted, peeled, and cut into 1" chunks
1 plum tomato, cored, seeded, and finely chopped
Juice of 1 lime
Tortilla chips, for serving
RECIPE
1. Chop the onion, cilantro, serrano chiles.
NOTE: it is VERY important to take out the seeds from the chiles.
NOTE 2: even after washing your hands a million times, DO NOT attempt to put contacts in. Stupid me tried (I have done it before with jalapenos, but I forgot that serranos have even more spicy oil than jalapenos).
2. In a large bowl mash together with a fork the onion, cilantro and chiles.
3. Add avocados and tomato to onion mixture and mash, trying to keep several large chunks of avocado.
4. Add lime juice and stir a few times just to blend in.
Enjoy! Like my neighbor Jenny did:

 |
| It was NYE - You have to have Wine, veggies and hummus, right? |
I started back on New Years Eve with a guacamole recipe that got the seal of approval from TS's brother Greg-with-two-g's. The guacamole recipe was from my Saveur magazine Mexican cooking challenge. So, part 5 of the challenge was guacamole. I intended to follow the recipe exactly, but part of it got left out in all the rush of New Years Eve. See, I made the guac after a long and hard game of broomball (boot hockey). I had pre-chopped all of the necessary ingredients, put them in Tupperware containers and then brought them to the party. Guac, to me, isn't as good if you make in a few hours in advance. It is one of those foods which must be made when you are ready to eat it. I did not bring the recipe with me, but it was so easy I thought I had it memorized. And - I forgot an ingredient.
My chopped garlic was in a tiny tupperware container (it was only 2 cloves of chopped garlic), and that got left in the bottom of the bag that I brought the rest of the ingredients. Oh well. Now you know, if you leave out the garlic, no one is going to miss it and it will still be an amazing guacamole.
Oh and a I also added an extra avocado since I knew there were going to be a bunch of people eating it.
The real recipe can be found here.
My version of this guacamole:
INGREDIENTS
¼ cup finely chopped white onion
2 tbsp. minced cilantro (I have freeze dried cilantro - so I used that)
4 serrano chiles, stemmed, seeded, and finely chopped
4 ripe avocados, halved, pitted, peeled, and cut into 1" chunks
1 plum tomato, cored, seeded, and finely chopped
Juice of 1 lime
Tortilla chips, for serving
RECIPE
1. Chop the onion, cilantro, serrano chiles.
NOTE: it is VERY important to take out the seeds from the chiles.
NOTE 2: even after washing your hands a million times, DO NOT attempt to put contacts in. Stupid me tried (I have done it before with jalapenos, but I forgot that serranos have even more spicy oil than jalapenos).
2. In a large bowl mash together with a fork the onion, cilantro and chiles.
3. Add avocados and tomato to onion mixture and mash, trying to keep several large chunks of avocado.
4. Add lime juice and stir a few times just to blend in.
Enjoy! Like my neighbor Jenny did:

Sunday, November 4, 2012
Chicken Sausage Penne with Broccoli
Every now and then I do create a recipe from scratch. This dinner was one of them and it was a success. TS and I purchased chicken sausage from Sam's the other week which means we have an abundance of chicken sausage and I need to think of creative ways to use it. Luckily it freezes very well.
For dinner the other night I made a healthy, quick pasta dish using the chicken sausage. TS said I could definitely make this dish again. Which, in TS's language, is it is very good. If a dish isn't so good, but he liked it, he would say it is a "few times a year meal." It is funny how you get to know your spouse's language the longer you are with them.

Here is the recipe for 2 people:
INGREDIENTS
3 links chicken sausage, sliced into 1/4 inch slices
2 cups chopped broccoli, pre-steamed
1/4 onion, sliced
2 cloves garlic, chopped
1.25 cups penne pasta
1/3 cup dry white wine
1 tsp olive oil
2 Tbsp grated Parmesan cheese
salt and pepper
RECIPE
1. Cook sliced chicken sausage over medium high heat in a 12in skillet until browned, remove from pan and set aside.
2. While the chicken sausage is cooking, start water for pasta to boil. Add pasta once boiled and cook for 7 mins.
3. In the same skillet you cooked the chicken sausage, add olive oil and heat for 1 min.
4. Slowly add white wine to pan, scraping the bottom of pan to loosen all bits of chicken sausage from bottom of the pan.
5. Cook wine until it boils, then add onion, garlic, broccoli, and salt and pepper to taste and cook until onion begins to soften, about 3-4 mins.
6. Add chicken sausage to pan and toss all together.
7. Drain pasta, once cooked, reserving 1/4 cup water. Add pasta water and pasta to chicken sausage mixture cook for 2 mins.
8. Add Parmesan cheese to pasta and sausage mixture and toss together and cook for another minute.
9. Serve!
Another healthy meal that takes about half hour. Perfect for a week night!
For dinner the other night I made a healthy, quick pasta dish using the chicken sausage. TS said I could definitely make this dish again. Which, in TS's language, is it is very good. If a dish isn't so good, but he liked it, he would say it is a "few times a year meal." It is funny how you get to know your spouse's language the longer you are with them.

Here is the recipe for 2 people:
INGREDIENTS
3 links chicken sausage, sliced into 1/4 inch slices
2 cups chopped broccoli, pre-steamed
1/4 onion, sliced
2 cloves garlic, chopped
1.25 cups penne pasta
1/3 cup dry white wine
1 tsp olive oil
2 Tbsp grated Parmesan cheese
salt and pepper
RECIPE
1. Cook sliced chicken sausage over medium high heat in a 12in skillet until browned, remove from pan and set aside.
2. While the chicken sausage is cooking, start water for pasta to boil. Add pasta once boiled and cook for 7 mins.
3. In the same skillet you cooked the chicken sausage, add olive oil and heat for 1 min.
4. Slowly add white wine to pan, scraping the bottom of pan to loosen all bits of chicken sausage from bottom of the pan.
5. Cook wine until it boils, then add onion, garlic, broccoli, and salt and pepper to taste and cook until onion begins to soften, about 3-4 mins.
6. Add chicken sausage to pan and toss all together.
7. Drain pasta, once cooked, reserving 1/4 cup water. Add pasta water and pasta to chicken sausage mixture cook for 2 mins.
8. Add Parmesan cheese to pasta and sausage mixture and toss together and cook for another minute.
9. Serve!
Another healthy meal that takes about half hour. Perfect for a week night!
Sunday, October 28, 2012
Spaghetti Carbonara
If you know me, you know besides baking and cooking another passion of mine is space and NASA and the privatization of the space industry. That being said, while I am writing this post, I have NASATV on so I can watch the release of the Dragon capsule from the International Space Station. I provided you with a link so I can spend my time on this blog talking about food, and you can read about the Dragon when you have time.
The other night I was in a rush to get home, make dinner and get back out. I also wanted to make something different for dinner. Typically I would turn to my shrimp and pasta recipe for a night like this, but I was not in the mood for that. I had read the recipe for spaghetti carbonara in my latest issue of Savuer and decided this recipe would be really easy to make on a night like it was set up to be. And I was right. It only took me a half hour from the time I got home to the time we had food on the table. A quick, easy and gourmet-type of recipe. These are the kinds of recipes I like.

I must also thank TS for making this recipe happen. He had to go to three different grocery stores to find pancetta. He found it at Kowalski's. He could not find it at Cub or Rainbow. You could also probably find it at Lunds or Byerly's.
The recipe, as I said, came from Saveur. I basically followed the recipe in Saveur. I did not have parsley, so I could not add that to the recipe. I also cut the recipe in half because it was for just the two of us, and the recipe makes enough for four. I will provide the recipe as I made it. If you are making it for 4, 6, 8 people just adjust the ingredients accordingly.
INGREDIENTS
(for 2 people)
1.5 tbsp. extra-virgin olive oil
2 cloves garlic, peeled and crushed
5 oz. pancetta, cut into ½″-long x ¼″-square strips
1/3 cup white wine
1/2 lb. dried spaghetti
1/3 cup + 1 Tbsp finely grated Parmesan & Romano mix
1 egg
Kosher salt and freshly ground black pepper, to taste
RECIPE
1. Heat oil in a 12″ skillet over medium-high heat AND start a pot of water for spaghetti to boil.
1a. When water has begun to boil, add pasta and cook for 7 mins.
2. Add garlic, and cook until golden, about 1 minute.
3. Remove and discard majority of garlic.
4. Add pancetta, and cook until edges are crisp, about 6 minutes.
5. While pancetta is cooking, in a large bowl, whisk together Parmesan/Romano mix and egg.
6. Add wine, and cook until thickened, about 3 minutes.
7. Remove pan from heat.
8. When pasta is completed cooking, drain, and reserve ¼ cup pasta water.
9. Slowly drizzle in reserved pasta water into the egg/cheese mixture and whisk until smooth.
10. Add pancetta/wine mixture to egg/cheese mixture and stir together.
11. Add spaghetti and season with fresh ground black pepper and a pinch of salt.
12. Toss to combine, and serve immediately.
Well, the Dragon was successfully released from the ISS and is on its way back to Earth. It should arrive off the coast of the Baja peninsula this afternoon.
Enjoy this recipe! It is a good one to make.
The other night I was in a rush to get home, make dinner and get back out. I also wanted to make something different for dinner. Typically I would turn to my shrimp and pasta recipe for a night like this, but I was not in the mood for that. I had read the recipe for spaghetti carbonara in my latest issue of Savuer and decided this recipe would be really easy to make on a night like it was set up to be. And I was right. It only took me a half hour from the time I got home to the time we had food on the table. A quick, easy and gourmet-type of recipe. These are the kinds of recipes I like.

I must also thank TS for making this recipe happen. He had to go to three different grocery stores to find pancetta. He found it at Kowalski's. He could not find it at Cub or Rainbow. You could also probably find it at Lunds or Byerly's.
The recipe, as I said, came from Saveur. I basically followed the recipe in Saveur. I did not have parsley, so I could not add that to the recipe. I also cut the recipe in half because it was for just the two of us, and the recipe makes enough for four. I will provide the recipe as I made it. If you are making it for 4, 6, 8 people just adjust the ingredients accordingly.
INGREDIENTS
(for 2 people)
1.5 tbsp. extra-virgin olive oil
2 cloves garlic, peeled and crushed
5 oz. pancetta, cut into ½″-long x ¼″-square strips
1/3 cup white wine
1/2 lb. dried spaghetti
1/3 cup + 1 Tbsp finely grated Parmesan & Romano mix
1 egg
Kosher salt and freshly ground black pepper, to taste
RECIPE
1. Heat oil in a 12″ skillet over medium-high heat AND start a pot of water for spaghetti to boil.
1a. When water has begun to boil, add pasta and cook for 7 mins.
2. Add garlic, and cook until golden, about 1 minute.
3. Remove and discard majority of garlic.
4. Add pancetta, and cook until edges are crisp, about 6 minutes.
5. While pancetta is cooking, in a large bowl, whisk together Parmesan/Romano mix and egg.
6. Add wine, and cook until thickened, about 3 minutes.
7. Remove pan from heat.
8. When pasta is completed cooking, drain, and reserve ¼ cup pasta water.
9. Slowly drizzle in reserved pasta water into the egg/cheese mixture and whisk until smooth.
10. Add pancetta/wine mixture to egg/cheese mixture and stir together.
11. Add spaghetti and season with fresh ground black pepper and a pinch of salt.
12. Toss to combine, and serve immediately.
Well, the Dragon was successfully released from the ISS and is on its way back to Earth. It should arrive off the coast of the Baja peninsula this afternoon.
Enjoy this recipe! It is a good one to make.
Saturday, October 6, 2012
Mexican Cooking Challenge Part #4
TS said "That dinner was awesome!" That is what I needed to hear after I spent from 430p to 730p on my feet in the kitchen, then from 8p to 845p in the kitchen. Now, not all of that was spent making Mexican food, but I just sat down and I'm exhausted. There is something about cold weather that makes me want to live in the kitchen. In the last 24 hours I have baked chocolate & peanut butter chip cookies and banana muffins. Then I made Mexican food from Saveur for dinner. Then I put together an egg bake for brunch tomorrow morning. I really need to buy a cushioned mat for my kitchen floor. (Or if someone wants to buy one for me for Chanukkah/Christmas I would gladly accept that gift).
This blog post is about the Mexican meal I prepared tonight, not my cookies or muffins or egg bake. I figured it was a cold Saturday, TS and I had nothing going on, so why not make a three part meal? The meal we ate tonight included pickled jalapeno peppers and Huarache con Carne Asada (homemade corn tortillas with red salsa and steak). The huarache required me to make a red salsa. I now have a little bit of salsa verde, a lot of enchilada sauce and a lot of salsa roja in my fridge. I think I may need to stop trying new foods until we eat all this salsa.
Like the past meals, the thing that took the longest to make was the salsa. Otherwise the meal was really easy. I started off by making the pickled jalapeno peppers earlier in the afternoon. That was SUPER easy. The best part about pickling is you make it and let it sit for a while. Which means that after I made it I took a nap, watched TV, played on the computer then baked and made dinner. If you like spicy foods, then these pickled jalapenos are for you. TS even said they were so spicy he could only eat one. I thought they were spicy, but then again I'm that person that puts a slice of jalapeno on each of my nachos when I go to a baseball game.
PART 1
Here is the recipe for pickle jalapenos: I did not change the Saveur recipe at all.

PICKLED JALAPENO PEPPERS
INGREDIENTS
2 tbsp. olive oil
1 small white onion, thinly sliced
1 medium carrot, thinly sliced crosswise
1 clove garlic, minced
10 green jalapeños, pricked with a paring knife
1 cup distilled white vinegar
2 cups water
1 ½ tsp. kosher salt
1 tsp. dried oregano
1 dried bay leaf
RECIPE
1. Heat olive oil in a 4-qt. saucepan over medium heat.
2. Add onion, carrot, and garlic, and cook, stirring, until barely tender, about 3 minutes.
3. Add jalapeños to onion mixture, and cook, stirring, for 4 minutes.
4. Add vinegar, salt, oregano, bay leaf, and 2 cups water, and bring to a boil.
5. Once boiling turn off heat and let peppers sit on stove until they reach room temperature (about 1 hour)
6. Either each once cooled, or put into a container and store in refrigerator until you are ready to eat them.
PART 2
Part two of this meal was the salsa. Like I said, this took the most time only because stuff had to sit, but I was able to do multiple things at the same time.
Similar to the pickled peppers, I followed the Saveur recipe exactly.
SALSA ROJA
INGREDIENTS
10 dried guajillo chiles
6 dried árbol chiles
3 cloves garlic, peeled
2 plum tomatoes, cored
1 small white onion, halved
Kosher salt, to taste
RECIPE
1. Heat a 12" skillet over medium-high heat.
2. Add guajillo and árbol chiles, and cook, turning as needed, until lightly toasted all over, about 1 minute.
3 Transfer peppers to a bowl, and cover with boiling water.
4. Cover the bowl and let the peppers sit until chiles are soft, about 20 minutes.
5. While chiles are sitting, return skillet to high heat.
6. Add tomatoes to skillet, cook for 3 mins. (turning every so often throughout the process)
7. Add onions to tomatoes and cook for 6 mins. (turning when you turn the tomatoes throughout the process)
8. Add garlic to skillet with tomatoes and onions and cook for 6 mins. (turning when you turn the tomatoes and onions)
9. Once the tomatoes, onions and garlic are blackened in some spots on each side, remove skillet from heat.
10. When chiles are done, drain chiles, reserving 1 cup soaking liquid.
11. Remove stems and seeds from both the guajillo and arbol chiles (yes the arbol chiles have a lot of seeds)
12. Put chiles and reserved soaking liquid to a blender.
13. Add tomatoes, onions and garlic to peppers in the blender.
14. Blend until smooth, about 2 mins.
15. Set salsa aside and let cool to room temperature.
This may seem like a lot of steps, but really it is fairly simple to make. The whole salsa took me about 30 mins to make. Part of the problem I had was added the chiles to the blender then read that I needed to de-seed them. So, I had to get them all out of the blender and remove the seeds. It does take some time to remove the seeds. Just be REALLY careful when you are removing the seeds. If you have a cut on your hand or you touch your eyes/face/etc. it will burn really badly. Make sure you wash your hands very well when you are done removing the seeds from the chiles before you move on.
PART 3
Now on to the main part of the meal. I did change this recipe up a bit, but only by decreasing the amount of oil I used. Also, this recipe serves 4 people and it was only TS and I eating, so I halved the ingredients to serve 2 people. I will give you the recipe for 2 people. That way if you want to make it for 4, 6 or 8 people just multiple the amounts by the appropriate factor.
The Saveur recipe can be found here.

HUARACHE CON CARNE ASADA
INGREDIENTS
3/4 cups masa harina
3/4. kosher salt, plus more to taste
1/2 cup warm water
1.5 Tbsp vegetable oil
1 cup salsa roja
1 oz. queso Cotija
2 (3-oz.) sirloin steaks, pounded to 1/8" thickness
1/2 medium white onion, cut into ¼"-thick slices
1/2 Large can sliced nopales (sliced cactus), drained and rinsed
1 avocado, halved, pitted, and peeled, for serving
RECIPE
1. Make the tortillas: Combine masa harina, salt, and 1 cup warm water in a large bowl
2. Stir until a smooth dough forms.
3. Knead dough in bowl until very smooth but not sticky, about 2 minutes.
4. Divide dough into half and shape each into a 7"-long, ¼"-thick oval.
5. Heat 1/2 tbsp. oil in a 12" cast-iron skillet over medium-high heat.
6. Add 1 tortilla to skillet, and cook until blackened in spots on bottom, about 3 minutes.
7. Flip and immediately spread with ¼ cup salsa and ½ oz. cheese; continue cooking until blackened in spots on bottom and cooked through, about 2 minutes more.
8. Transfer to a serving plate.
9. Repeat with other tortilla.
10. Return skillet to high heat, and add 1/2 tbsp. oil.
11. Season steaks with salt, and add 2 steaks to skillet
12. Cook, turning once, until browned on both sides and cooked through, about 3 minutes.
13. Place one steak over each tortilla.
14. Return skillet to high heat.
15. Add onion, and cook, stirring often, until just tender, about 5 minutes.
16. Add cactus, and cook until heated through, about 2 minutes.
17. Divide cactus and onions among steaks
18. Serve immediately with an avocado half on each plate.
A lot of steps, but the whole process took me 15 minutes. Things move really quickly with this one. TS said this one was one of his favorite dishes I have made so far. I am batting 100 with this cooking challenge. We'll see how it goes as we move further into the fall and winter.
I hope you are enjoying these posts. I must say I am loving learning how to make Mexican food! This food is so different from what we get when we go out for Mexican food. It actually is fairly healthy too. There is virtually no fat in anything besides the oil that I used to cook the tortillas and meat. And in the end, I even reduced that. So, here's to good, reasonably healthy eating!
This blog post is about the Mexican meal I prepared tonight, not my cookies or muffins or egg bake. I figured it was a cold Saturday, TS and I had nothing going on, so why not make a three part meal? The meal we ate tonight included pickled jalapeno peppers and Huarache con Carne Asada (homemade corn tortillas with red salsa and steak). The huarache required me to make a red salsa. I now have a little bit of salsa verde, a lot of enchilada sauce and a lot of salsa roja in my fridge. I think I may need to stop trying new foods until we eat all this salsa.
Like the past meals, the thing that took the longest to make was the salsa. Otherwise the meal was really easy. I started off by making the pickled jalapeno peppers earlier in the afternoon. That was SUPER easy. The best part about pickling is you make it and let it sit for a while. Which means that after I made it I took a nap, watched TV, played on the computer then baked and made dinner. If you like spicy foods, then these pickled jalapenos are for you. TS even said they were so spicy he could only eat one. I thought they were spicy, but then again I'm that person that puts a slice of jalapeno on each of my nachos when I go to a baseball game.
PART 1
Here is the recipe for pickle jalapenos: I did not change the Saveur recipe at all.

PICKLED JALAPENO PEPPERS
INGREDIENTS
2 tbsp. olive oil
1 small white onion, thinly sliced
1 medium carrot, thinly sliced crosswise
1 clove garlic, minced
10 green jalapeños, pricked with a paring knife
1 cup distilled white vinegar
2 cups water
1 ½ tsp. kosher salt
1 tsp. dried oregano
1 dried bay leaf
RECIPE
1. Heat olive oil in a 4-qt. saucepan over medium heat.
2. Add onion, carrot, and garlic, and cook, stirring, until barely tender, about 3 minutes.
3. Add jalapeños to onion mixture, and cook, stirring, for 4 minutes.
4. Add vinegar, salt, oregano, bay leaf, and 2 cups water, and bring to a boil.
5. Once boiling turn off heat and let peppers sit on stove until they reach room temperature (about 1 hour)
6. Either each once cooled, or put into a container and store in refrigerator until you are ready to eat them.
PART 2
Part two of this meal was the salsa. Like I said, this took the most time only because stuff had to sit, but I was able to do multiple things at the same time.
Similar to the pickled peppers, I followed the Saveur recipe exactly.
SALSA ROJA
INGREDIENTS
10 dried guajillo chiles
6 dried árbol chiles
3 cloves garlic, peeled
2 plum tomatoes, cored
1 small white onion, halved
Kosher salt, to taste
RECIPE
1. Heat a 12" skillet over medium-high heat.
2. Add guajillo and árbol chiles, and cook, turning as needed, until lightly toasted all over, about 1 minute.
3 Transfer peppers to a bowl, and cover with boiling water.
4. Cover the bowl and let the peppers sit until chiles are soft, about 20 minutes.
5. While chiles are sitting, return skillet to high heat.
6. Add tomatoes to skillet, cook for 3 mins. (turning every so often throughout the process)
7. Add onions to tomatoes and cook for 6 mins. (turning when you turn the tomatoes throughout the process)
8. Add garlic to skillet with tomatoes and onions and cook for 6 mins. (turning when you turn the tomatoes and onions)
9. Once the tomatoes, onions and garlic are blackened in some spots on each side, remove skillet from heat.
10. When chiles are done, drain chiles, reserving 1 cup soaking liquid.
11. Remove stems and seeds from both the guajillo and arbol chiles (yes the arbol chiles have a lot of seeds)
12. Put chiles and reserved soaking liquid to a blender.
13. Add tomatoes, onions and garlic to peppers in the blender.
14. Blend until smooth, about 2 mins.
15. Set salsa aside and let cool to room temperature.
This may seem like a lot of steps, but really it is fairly simple to make. The whole salsa took me about 30 mins to make. Part of the problem I had was added the chiles to the blender then read that I needed to de-seed them. So, I had to get them all out of the blender and remove the seeds. It does take some time to remove the seeds. Just be REALLY careful when you are removing the seeds. If you have a cut on your hand or you touch your eyes/face/etc. it will burn really badly. Make sure you wash your hands very well when you are done removing the seeds from the chiles before you move on.
PART 3
Now on to the main part of the meal. I did change this recipe up a bit, but only by decreasing the amount of oil I used. Also, this recipe serves 4 people and it was only TS and I eating, so I halved the ingredients to serve 2 people. I will give you the recipe for 2 people. That way if you want to make it for 4, 6 or 8 people just multiple the amounts by the appropriate factor.
The Saveur recipe can be found here.

HUARACHE CON CARNE ASADA
INGREDIENTS
3/4 cups masa harina
3/4. kosher salt, plus more to taste
1/2 cup warm water
1.5 Tbsp vegetable oil
1 cup salsa roja
1 oz. queso Cotija
2 (3-oz.) sirloin steaks, pounded to 1/8" thickness
1/2 medium white onion, cut into ¼"-thick slices
1/2 Large can sliced nopales (sliced cactus), drained and rinsed
1 avocado, halved, pitted, and peeled, for serving
RECIPE
1. Make the tortillas: Combine masa harina, salt, and 1 cup warm water in a large bowl
2. Stir until a smooth dough forms.
3. Knead dough in bowl until very smooth but not sticky, about 2 minutes.
4. Divide dough into half and shape each into a 7"-long, ¼"-thick oval.
5. Heat 1/2 tbsp. oil in a 12" cast-iron skillet over medium-high heat.
6. Add 1 tortilla to skillet, and cook until blackened in spots on bottom, about 3 minutes.
7. Flip and immediately spread with ¼ cup salsa and ½ oz. cheese; continue cooking until blackened in spots on bottom and cooked through, about 2 minutes more.
8. Transfer to a serving plate.
9. Repeat with other tortilla.
10. Return skillet to high heat, and add 1/2 tbsp. oil.
11. Season steaks with salt, and add 2 steaks to skillet
12. Cook, turning once, until browned on both sides and cooked through, about 3 minutes.
13. Place one steak over each tortilla.
14. Return skillet to high heat.
15. Add onion, and cook, stirring often, until just tender, about 5 minutes.
16. Add cactus, and cook until heated through, about 2 minutes.
17. Divide cactus and onions among steaks
18. Serve immediately with an avocado half on each plate.
A lot of steps, but the whole process took me 15 minutes. Things move really quickly with this one. TS said this one was one of his favorite dishes I have made so far. I am batting 100 with this cooking challenge. We'll see how it goes as we move further into the fall and winter.
I hope you are enjoying these posts. I must say I am loving learning how to make Mexican food! This food is so different from what we get when we go out for Mexican food. It actually is fairly healthy too. There is virtually no fat in anything besides the oil that I used to cook the tortillas and meat. And in the end, I even reduced that. So, here's to good, reasonably healthy eating!
Sunday, September 30, 2012
A Taste of Fall: Applesauce
Every year for the last seven years I have gone apple picking. It started as a tradition with my sister-in-law when she was a junior in high school. Once she moved away for college, my friend Erin started going apple picking with me. Erin and I have gone every year since. It is one of my favorite fall traditions. I hope that I am able to continue apple picking in the fall as life moves forward.
We always pick a peck of apples. According to Wikipedia, a peck is equal to two dry gallons or a quarter of a bushel. I must admit, this makes no sense to me. Why doesn't a peck equal a specific mass? Maybe that is just the metric-system lover in me. Anyway, here is what two one-peck bags of apples looks like:
 Erin and I decided this year that we were going to be smart and only pick Cortland apples. Cortlands are red apples which are tart and crisp and perfect for baking. Since we only really use the apples for baking, we felt only picking the baking ones would be the best use of our pecks. I definitely picked enough apples to last me through the next week or two of baking.
This morning, I asked TS what I should make with the apples. He asked me how hard it would be to make applesauce. I told him, probably not difficult at all, if I used my Crock Pot. I was definitely correct that it would not be difficult. This could not have been an easier food to make. Because it is so easy, I may never buy applesauce again. TS even said it smelled so good that he "wanted to eat the house."
Here is your super easy Crock Pot applesauce recipe:

Makes 3 small jars.
INGREDIENTS
5 large apples, peeled, cored and cut into quarters
3/4 tsp cinnamon
1 tsp vanilla
1 Tbsp dark brown sugar
1/4 c. water
RECIPE
1. Place peeled, cored and quartered apples into the Crock Pot.
2. Sprinkle cinnamon and brown sugar over all the apples so all apples are evenly covered with sugar and cinnamon.
3. Pour vanilla over all the apples.
4. Pour water into the Crock Pot.
5. Cook apples for 4-5 hours on low.
6. When apples can be mashed with a fork, they are done. Mash the apples until desired consistency.
7. Place in a separate container (I used jars) and set to cool.
See? How easy is that?! Enjoy your taste of fall with this recipe.
We always pick a peck of apples. According to Wikipedia, a peck is equal to two dry gallons or a quarter of a bushel. I must admit, this makes no sense to me. Why doesn't a peck equal a specific mass? Maybe that is just the metric-system lover in me. Anyway, here is what two one-peck bags of apples looks like:

This morning, I asked TS what I should make with the apples. He asked me how hard it would be to make applesauce. I told him, probably not difficult at all, if I used my Crock Pot. I was definitely correct that it would not be difficult. This could not have been an easier food to make. Because it is so easy, I may never buy applesauce again. TS even said it smelled so good that he "wanted to eat the house."
Here is your super easy Crock Pot applesauce recipe:

Makes 3 small jars.
INGREDIENTS
5 large apples, peeled, cored and cut into quarters
3/4 tsp cinnamon
1 tsp vanilla
1 Tbsp dark brown sugar
1/4 c. water
RECIPE
1. Place peeled, cored and quartered apples into the Crock Pot.
2. Sprinkle cinnamon and brown sugar over all the apples so all apples are evenly covered with sugar and cinnamon.
3. Pour vanilla over all the apples.
4. Pour water into the Crock Pot.
5. Cook apples for 4-5 hours on low.
6. When apples can be mashed with a fork, they are done. Mash the apples until desired consistency.
7. Place in a separate container (I used jars) and set to cool.
See? How easy is that?! Enjoy your taste of fall with this recipe.
Saturday, September 29, 2012
Mexican Cooking Challenge #3
Last night I made meal number three from the Saveur Mexican cooking issue. I had to make this recipe last night because one of the ingredients is this close to being out of season and after this week will be completely unavailable until next August/September. That would not work with the fact that I would like to make all of these recipes before spring sets in. The ingredient at issue - squash blossoms.
Squash blossoms? Yes, they are the flower that comes before a squash grows. Yes, the flower is eatable. In this recipe it is more decorative than flavorful. But, I did not know that until we ate them last night. You are probably wondering what I made with squash blossoms. Soup. Sinus clearing spicy, chicken soup. This recipe was actually really easy to make. So, if you have a cold and are not feeling well, this chicken soup is spicy enough to make that cold go away. You really don't need the squash blossoms to make this recipe, but it was required as Saveur wrote the recipe, so I used them.
Before I continue, I must say "Thank you" to my neighbor Jenny for the squash blossoms. She and her sons are growing squash this year. She allowed me to go into her backyard and pick as many as I wanted. So, thank you Jenny. I dedicate this soup recipe to you.
I must also let you know that I partially made a second recipe. I made a tomatillo salsa that is supposed to be served with an avocado. I had everything in the house, but when it got around to the avocado, it was not quite ripe (I forgot to tell TS how to tell if an avocado is ripe when he went grocery shopping). Not ripe avocados are not tasty. I went ahead and served the salsa with the queso fresco and tortillas as a side to the soup, but I will have to make this recipe again so I say I made the complete recipe. I will give you the recipe for the tomatillo salsa in the mean time because it was really good. It was actually kind of mild and a nice addition as a side to the soup.
First the soup recipe: Caldo Xochitl con Flor de Calabaza (Squash Blossom Soup)
(The Saveur recipe can be found here)

Serves 6-8
INGREDIENTS
8 cups chicken stock
8 bone-in, skinless chicken thighs
2 cups crumbled queso fresco
1 cup cooked rice
8 chipotle chiles in adobo, finely chopped
4 serrano chiles, stemmed, seeded, and minced
½ medium white onion, minced
1 cup roughly torn squash blossoms
½ cup minced cilantro leaves
RECIPE
1. Bring stock and chicken to a boil over medium-high heat
2. Once boiled, reduce heat to medium-low and cook, covered, until chicken is cooked through, about 25 minutes.
3. While chicken is cooking in the broth, assemble the queso fresco, the chipotles, serrano chiles, onion, squash blossoms and cilantro. As each one is chopped, minced or torn, put that ingredient in a separate bowl.
4. When chicken is cooked, remove chicken and transfer to a bowl and finely shred chicken.
5. To serve: divide chicken, cheese, rice, both chiles, and onion among serving bowls; top with squash blossoms, and then ladle hot broth into bowls. Sprinkle with cilantro before serving.
Now for the tomatillo salsa recipe:

¼ cup minced white onion
2 serrano chiles, stemmed, seeded, and finely chopped
1 clove garlic, minced
Kosher salt, to taste
RECIPE
1. Bring tomatillos and 4 cups water to a boil in a 4-qt. saucepan; cook until tomatillos are just soft, about 5 minutes.
2. Drain and set tomatillos aside to cool.
3. In a food processor, put tomatillos, 1/3 cup cilantro, 2 tbsp onion, serrano chile, garlic and salt.
4. Pulse food processor until slightly chunky (about 20 pulses).
I will probably make the full recipe, as posted on Saveur, later this week when the avocado has ripened.
Squash blossoms? Yes, they are the flower that comes before a squash grows. Yes, the flower is eatable. In this recipe it is more decorative than flavorful. But, I did not know that until we ate them last night. You are probably wondering what I made with squash blossoms. Soup. Sinus clearing spicy, chicken soup. This recipe was actually really easy to make. So, if you have a cold and are not feeling well, this chicken soup is spicy enough to make that cold go away. You really don't need the squash blossoms to make this recipe, but it was required as Saveur wrote the recipe, so I used them.
Before I continue, I must say "Thank you" to my neighbor Jenny for the squash blossoms. She and her sons are growing squash this year. She allowed me to go into her backyard and pick as many as I wanted. So, thank you Jenny. I dedicate this soup recipe to you.
I must also let you know that I partially made a second recipe. I made a tomatillo salsa that is supposed to be served with an avocado. I had everything in the house, but when it got around to the avocado, it was not quite ripe (I forgot to tell TS how to tell if an avocado is ripe when he went grocery shopping). Not ripe avocados are not tasty. I went ahead and served the salsa with the queso fresco and tortillas as a side to the soup, but I will have to make this recipe again so I say I made the complete recipe. I will give you the recipe for the tomatillo salsa in the mean time because it was really good. It was actually kind of mild and a nice addition as a side to the soup.
First the soup recipe: Caldo Xochitl con Flor de Calabaza (Squash Blossom Soup)
(The Saveur recipe can be found here)

Serves 6-8
INGREDIENTS
8 cups chicken stock
8 bone-in, skinless chicken thighs
2 cups crumbled queso fresco
1 cup cooked rice
8 chipotle chiles in adobo, finely chopped
4 serrano chiles, stemmed, seeded, and minced
½ medium white onion, minced
1 cup roughly torn squash blossoms
½ cup minced cilantro leaves
RECIPE
1. Bring stock and chicken to a boil over medium-high heat
2. Once boiled, reduce heat to medium-low and cook, covered, until chicken is cooked through, about 25 minutes.
3. While chicken is cooking in the broth, assemble the queso fresco, the chipotles, serrano chiles, onion, squash blossoms and cilantro. As each one is chopped, minced or torn, put that ingredient in a separate bowl.
4. When chicken is cooked, remove chicken and transfer to a bowl and finely shred chicken.
5. To serve: divide chicken, cheese, rice, both chiles, and onion among serving bowls; top with squash blossoms, and then ladle hot broth into bowls. Sprinkle with cilantro before serving.
Now for the tomatillo salsa recipe:

INGREDIENTS
8oz. tomatillos, husks removed, rinsed
⅓ cup plus 2 tbsp. roughly chopped cilantro¼ cup minced white onion
2 serrano chiles, stemmed, seeded, and finely chopped
1 clove garlic, minced
Kosher salt, to taste
RECIPE
1. Bring tomatillos and 4 cups water to a boil in a 4-qt. saucepan; cook until tomatillos are just soft, about 5 minutes.
2. Drain and set tomatillos aside to cool.
3. In a food processor, put tomatillos, 1/3 cup cilantro, 2 tbsp onion, serrano chile, garlic and salt.
4. Pulse food processor until slightly chunky (about 20 pulses).
I will probably make the full recipe, as posted on Saveur, later this week when the avocado has ripened.
Wednesday, September 26, 2012
Kugel: What is Served at Every Break-the-Fast
L'shana Tova! Happy New Year! On Yom Kipur you fast all day and end the fast with a big meal with family and friends to break the fast. At this meal you have traditional Jewish foods. For example, last year I think we had bagels, lox, salad, kugel, quiche and my apple upside down cake for dessert. This year, TS and I are going to my friend Sheila's house.
As a good friend should do, I asked Sheila what I should bring with me for the Break-the-Fast. The one thing she requested was kugel. For those who do not know, kugel is a noodle or potato pudding. It can be sweet or savory. I make both, but for this meal it was a sweet one.
Everyone has their own sweet kugel recipe, but the base is the same. Egg noodles, sour cream or cottage cheese or cream cheese, cinnamon and sugar. After that the additions vary according to families. My sister and I have been making kugel together for years. This is actually the first Yom Kipur in probably 4 years where my sister has not been here to assist in the kugel making. It was kind of sad. We normally make the kugel while drinking diet cokes (we consume liquids without calories on Yom Kipur -- our version of fasting) and talk about what foods we want to eat. This time, I was alone in the kitchen, drinking a diet Dr. Pepper and thinking about how I wanted to lick the spoon and eat a slice of pumpkin pie. One had just come out of the oven, see below. Oh well. My sister is at work in a hospital right now, probably drinking a diet coke and thinking about the kugel she has in her bag for breaking her fast.
Here is my kugel recipe. Or at least the recipe I made for this year's break the fast. You may notice in the picture, and the recipe, there are raisins in only half the kugel. TS does not like raisins. This year I was nice and instead of him not eating the kugel because there were raisins, he now has a half to choose from that does not have raisins in it. The recipe shows you how to add raisins to just one half of the kugel.

Ingredients
8oz wide egg noodles
2 cups sour cream
16oz cottage cheese
1/2 cup sugar + 1 Tbsp sugar
2 tsp cinnamon
6 eggs
1/2 stick of butter, melted and cooled
1 small can crushed pineapple, drained
1/2 cup raisins
Recipe
Preheat oven 375 degrees.
1. Boil egg noodles for 4 mins, then drain
2. In a large bowl beat eggs for 1 minute, then add sour cream, cottage cheese, pineapple and cooled, melted butter. Stir together until fully combined.
3. Stir in 1/2 cup sugar, 1.5 tsp cinnamon to egg mixture.
4. Fold in cooked, drained egg noodles to egg mixture.
5. Coat 9x13 baking dish with cooking spray.
6. Pour noodle mixture into baking dish.
7. Stir in raisins into half the noodle mixture. (if you want raisins in all of the kugel, then mix them when you add your pineapple)
8. Mix together 1 Tbps sugar and 1/2 tsp cinnamon in small bowl, then sprinkle mixture over all of the kugel.
9. Bake for 40 mins.
10. Cool and serve.

As a good friend should do, I asked Sheila what I should bring with me for the Break-the-Fast. The one thing she requested was kugel. For those who do not know, kugel is a noodle or potato pudding. It can be sweet or savory. I make both, but for this meal it was a sweet one.
Everyone has their own sweet kugel recipe, but the base is the same. Egg noodles, sour cream or cottage cheese or cream cheese, cinnamon and sugar. After that the additions vary according to families. My sister and I have been making kugel together for years. This is actually the first Yom Kipur in probably 4 years where my sister has not been here to assist in the kugel making. It was kind of sad. We normally make the kugel while drinking diet cokes (we consume liquids without calories on Yom Kipur -- our version of fasting) and talk about what foods we want to eat. This time, I was alone in the kitchen, drinking a diet Dr. Pepper and thinking about how I wanted to lick the spoon and eat a slice of pumpkin pie. One had just come out of the oven, see below. Oh well. My sister is at work in a hospital right now, probably drinking a diet coke and thinking about the kugel she has in her bag for breaking her fast.
Here is my kugel recipe. Or at least the recipe I made for this year's break the fast. You may notice in the picture, and the recipe, there are raisins in only half the kugel. TS does not like raisins. This year I was nice and instead of him not eating the kugel because there were raisins, he now has a half to choose from that does not have raisins in it. The recipe shows you how to add raisins to just one half of the kugel.

Ingredients
8oz wide egg noodles
2 cups sour cream
16oz cottage cheese
1/2 cup sugar + 1 Tbsp sugar
2 tsp cinnamon
6 eggs
1/2 stick of butter, melted and cooled
1 small can crushed pineapple, drained
1/2 cup raisins
Recipe
Preheat oven 375 degrees.
1. Boil egg noodles for 4 mins, then drain
2. In a large bowl beat eggs for 1 minute, then add sour cream, cottage cheese, pineapple and cooled, melted butter. Stir together until fully combined.
3. Stir in 1/2 cup sugar, 1.5 tsp cinnamon to egg mixture.
4. Fold in cooked, drained egg noodles to egg mixture.
5. Coat 9x13 baking dish with cooking spray.
6. Pour noodle mixture into baking dish.
7. Stir in raisins into half the noodle mixture. (if you want raisins in all of the kugel, then mix them when you add your pineapple)
8. Mix together 1 Tbps sugar and 1/2 tsp cinnamon in small bowl, then sprinkle mixture over all of the kugel.
9. Bake for 40 mins.
10. Cool and serve.
What I was thinking about while making kugel:

pumpkin pie with homemade pie crust.
L'SHANA TOVA or as my Grandmother says "Gut Yuntif"
Sunday, September 23, 2012
Mexican Cooking Challenge Part 2
I was serious when I said I was going to cook every recipe in the Saveur Mexican Issue. (In case you forgot the magazine can be found at www.saveur.com) There are well over 30 recipes in this magazine which includes everything from salsas to stews to churros (that's going to be a fun one to make). Well, I have now made 2 of the recipes.
Friday night I decided to make the Enchiladas de Chile Ajo (Oaxacan Red Chile Enchiladas). I must give warning ahead of time that this is a spicy recipe, so you Minnesotans who are reading this blog, you might want to "have some beer or a pop next to you" when you eat it. (That is what the cheese/general store owner told TS and I when we were buying spicy cheese curds last weekend when we brought my parents to see the twine ball. The cheese curds aren't that spicy).
The recipe may seem intense, and I'm not going to lie, it did require me to perform multiple tasks at one time. I recommend reading the whole recipe through so you know what has to be done at each step. It is not like I don't read every recipe all the way through multiple times before I start, but with this one I was especially glad I did. If you do read the recipe all the way through, it is not much to tackle. Just make sure you are using the time stuff is resting or cooking to do something else.
All that being said, this recipe was well worth the effort. All the time and effort was put into making the enchilada sauce. This recipe made A LOT of enchilada sauce.

This is the leftovers! Let's just say TS and I will eat a few more meals using the enchilada sauce. To me, making a recipe that provides leftovers is the next best thing to going out.

The recipe from Saveur for Enchiladas de Chile Ajo can be found here. My adaption (which isn't much of an adaption) is below.
INGREDIENTS
3 oz. dried guajillo chiles (can be found at your local Mexican market)
8 cloves garlic, peeled
6 plum tomatoes, cored
2 serrano chiles, stemmed (also can be found at your local Mexican market)
½ large white onion, cut into ½" slices, plus 1 medium white onion, minced
1 tbsp. canola oil
2 cups chicken stock
1 tsp. dried oregano
1 tsp. dried thyme
¼ tsp. freshly ground black pepper
1 slice white sandwich bread, toasted and crumbled (I actually used some left over challah that my mom made for me last week)
¼ cup packed light brown sugar
2 tbsp. fresh lime juice
Kosher salt, to taste
18 6" corn tortillas (for 2 of us I only made 7 tortillas, but as you saw there was plenty of sauce)
1 ½ cups shredded cooked chicken (I used left over chicken breasts and shredded the meat, but if you do not have left over chicken you can buy a roasted chicken from your grocery store and shred the meat)
¾ cup crumbled Cotija cheese, plus more to garnish (you can find this at your local Mexican market)
INSTRUCTIONS
1. Heat a 12" skillet over high heat, and add guajillo chiles.
1a. Cook, turning once, until lightly toasted, about 2 minutes.
1b. Transfer to a bowl and cover with 3 cups boiling water; let sit until soft, about 20 minutes.
1c. Drain chiles, reserving soaking liquid, and remove stems and seeds.
1d. Transfer chiles to a blender along with 1 ½ cups soaking liquid; purée until smooth, and set chile purée aside.
2. While guajillo chiles are steaming, return skillet to high heat, and add garlic, tomatoes, chiles, and large onion slices.
2a. Cook, turning as needed, until vegetables are lightly charred all over, about 8 minutes for the garlic, 14 minutes for the tomatoes, chiles, and onion slices.
2b. Transfer vegetables to a bowl, and let cool.
3. Once vegetables are done cooking and set to cool and you have followed all of step 1, return skillet to high heat, and add 1 tbsp. oil; add chile purée, and fry, stirring constantly, until thickened to a paste, about 12 minutes.
4. After making the paste, pour it into a blender adding charred vegetables, chicken stock, oregano, thyme, pepper, and bread; purée until smooth, at least 2 minutes.
5. Pour through a fine strainer into skillet, and return skillet to medium-high heat; bring to a boil.
5a. Once sauce has begun to boil, reduce heat to medium-low, and cook until slightly reduced, about 6 minutes.
5b. Stir in brown sugar and lime juice, and season with salt.
5c. Keep enchilada sauce warm in skillet.
6. Spray a skillet with cooking spray and heat over medium-high heat.
6a. Heat 1 tortilla at a time, about 30 seconds on each side.
6b. Grasp tortilla with tongs and transfer tortillas to skillet with enchilada sauce, flip the tortilla so each side is coated.
6c. Place coated tortilla on a place and add some cheese, diced onion and chicken in the center of the tortilla and roll tortilla to form tight roll.
6d. Transfer rolled tortilla to a baking pan (I used my Pyrex baking pan) and repeat steps 6a-6c until complete.
7. Sprinkle cheese on top of enchiladas and serve.
TS said that this recipe was one I could make anytime I wanted to! Seeing how much sauce I have left over, we will be eating this again really soon.
Friday night I decided to make the Enchiladas de Chile Ajo (Oaxacan Red Chile Enchiladas). I must give warning ahead of time that this is a spicy recipe, so you Minnesotans who are reading this blog, you might want to "have some beer or a pop next to you" when you eat it. (That is what the cheese/general store owner told TS and I when we were buying spicy cheese curds last weekend when we brought my parents to see the twine ball. The cheese curds aren't that spicy).
The recipe may seem intense, and I'm not going to lie, it did require me to perform multiple tasks at one time. I recommend reading the whole recipe through so you know what has to be done at each step. It is not like I don't read every recipe all the way through multiple times before I start, but with this one I was especially glad I did. If you do read the recipe all the way through, it is not much to tackle. Just make sure you are using the time stuff is resting or cooking to do something else.
All that being said, this recipe was well worth the effort. All the time and effort was put into making the enchilada sauce. This recipe made A LOT of enchilada sauce.

And the final product looked like this:

The recipe from Saveur for Enchiladas de Chile Ajo can be found here. My adaption (which isn't much of an adaption) is below.
INGREDIENTS
3 oz. dried guajillo chiles (can be found at your local Mexican market)
8 cloves garlic, peeled
6 plum tomatoes, cored
2 serrano chiles, stemmed (also can be found at your local Mexican market)
½ large white onion, cut into ½" slices, plus 1 medium white onion, minced
1 tbsp. canola oil
2 cups chicken stock
1 tsp. dried oregano
1 tsp. dried thyme
¼ tsp. freshly ground black pepper
1 slice white sandwich bread, toasted and crumbled (I actually used some left over challah that my mom made for me last week)
¼ cup packed light brown sugar
2 tbsp. fresh lime juice
Kosher salt, to taste
18 6" corn tortillas (for 2 of us I only made 7 tortillas, but as you saw there was plenty of sauce)
1 ½ cups shredded cooked chicken (I used left over chicken breasts and shredded the meat, but if you do not have left over chicken you can buy a roasted chicken from your grocery store and shred the meat)
¾ cup crumbled Cotija cheese, plus more to garnish (you can find this at your local Mexican market)
INSTRUCTIONS
1. Heat a 12" skillet over high heat, and add guajillo chiles.
1a. Cook, turning once, until lightly toasted, about 2 minutes.
1b. Transfer to a bowl and cover with 3 cups boiling water; let sit until soft, about 20 minutes.
1c. Drain chiles, reserving soaking liquid, and remove stems and seeds.
1d. Transfer chiles to a blender along with 1 ½ cups soaking liquid; purée until smooth, and set chile purée aside.
2. While guajillo chiles are steaming, return skillet to high heat, and add garlic, tomatoes, chiles, and large onion slices.
2a. Cook, turning as needed, until vegetables are lightly charred all over, about 8 minutes for the garlic, 14 minutes for the tomatoes, chiles, and onion slices.
2b. Transfer vegetables to a bowl, and let cool.
3. Once vegetables are done cooking and set to cool and you have followed all of step 1, return skillet to high heat, and add 1 tbsp. oil; add chile purée, and fry, stirring constantly, until thickened to a paste, about 12 minutes.
4. After making the paste, pour it into a blender adding charred vegetables, chicken stock, oregano, thyme, pepper, and bread; purée until smooth, at least 2 minutes.
5. Pour through a fine strainer into skillet, and return skillet to medium-high heat; bring to a boil.
5a. Once sauce has begun to boil, reduce heat to medium-low, and cook until slightly reduced, about 6 minutes.
5b. Stir in brown sugar and lime juice, and season with salt.
5c. Keep enchilada sauce warm in skillet.
6. Spray a skillet with cooking spray and heat over medium-high heat.
6a. Heat 1 tortilla at a time, about 30 seconds on each side.
6b. Grasp tortilla with tongs and transfer tortillas to skillet with enchilada sauce, flip the tortilla so each side is coated.
6c. Place coated tortilla on a place and add some cheese, diced onion and chicken in the center of the tortilla and roll tortilla to form tight roll.
6d. Transfer rolled tortilla to a baking pan (I used my Pyrex baking pan) and repeat steps 6a-6c until complete.
7. Sprinkle cheese on top of enchiladas and serve.
TS said that this recipe was one I could make anytime I wanted to! Seeing how much sauce I have left over, we will be eating this again really soon.
Saturday, September 22, 2012
Something Sweet for the New Year
Note: This was to be posted on Wednesday, but life kind of got in the way and I am just completing this now on Saturday.
My parents were in town to celebrate Rosh Hashana with TS and me. I love it when my parents come up because we eat well, and in my book, eating well is the best thing ever. I think my parents enjoyed seeing the largest ball of twine made by a single man more than the restaurants. But, then again, who wouldn't love seeing the ball of twine in Darwin, MN?
Before I get sidetracked on the ball of twine, I must provide you with a recipe. My friend Sascha and I decided to make Erev Rosh Hashana dinner for our parents (and it turns out Marisa came too!). Since it is Rosh Hashana we had to have apple something. Well, we doubled up on the apples for dessert. Sascha made a French Apple Torte that was delicious with my Apple Cider Cinnamon ice cream.
Now, I take no credit for this recipe coming out of my creation. I just followed a recipe from Saveur. Remember? That is the magazine from the last post. Now you can see why I love my father so much for giving me a subscription to this magazine. The ice cream was perfect! Smooth, creamy, apple-y, cinnamon-y and the perfect complement to Sascha's torte.
If you are going to make this recipe, you do need an ice cream maker. When TS and I were registering for gifts some of the "fun" kitchen items for which we registered were an ice cream maker and a malt/shake maker. Highly recommended for your kitchen on our opinion. If you are going to get an ice cream maker I recommend the Cuisinart 2 Quart Ice Cream maker. I have yet to have any complaints with it.
Now you are probably anxious for the recipe. The official recipe is here, but mine adaption is below:
INGREDIENTS
2 cups apple cider
¾ cup sugar
1 stick cinnamon
2 cups 2% milk
2 cups heavy cream
¼ tsp. ground vietnamese cinnamon (you can use regular cinnamon, but I have learned that Vietnamese cinnamon is stronger and more intense)
6 egg yolks
INSTRUCTIONS
1. In a 4 quart saucepan add apple cider, sugar and cinnamon stick and whisk together.
2. Stirring occasionally, bring mixture to boil over medium-high heat.
3. Once mixture has boiled, reduce heat slightly and continue to boil and stir until reduced by at least half (boil for about 25-30 minutes)
4. When reduced, remove pot from heat and take out cinnamon stick.
5. Stir milk and cream into apple cider mixture until smooth.
6. Add ground cinnamon and egg yolks to milk/cider mixture and whisk together until smooth.
7. Put pot back on stove and stirring often, cook mixture until the mixture thickens and will coat the back of a wooden spoon. (about 20-25 minutes).
8. Pour thickened mixture through a strainer and into a medium sized bowl.
9. Refrigerate mixture about 2-3 hours until chilled.
10. Once chilled, pour mixture into your ice cream maker and follow ice cream maker's instructions for making ice cream. (mine I had to pour the mixture into the ice cream maker and turn it on for 20-25 minutes, until the mixture was thick, and slowly moving over the blade, but not so slow that it looked hard. Almost the consistency of partially melted frozen yogurt)
11. Pour mixture from ice cream maker into a bowl and freeze for at least 4 hours.
This ice cream was a hit at Rosh Hashana dinner. However, it would be a great addition to any meal during the year.
L'shana Tova!
My parents were in town to celebrate Rosh Hashana with TS and me. I love it when my parents come up because we eat well, and in my book, eating well is the best thing ever. I think my parents enjoyed seeing the largest ball of twine made by a single man more than the restaurants. But, then again, who wouldn't love seeing the ball of twine in Darwin, MN?
Before I get sidetracked on the ball of twine, I must provide you with a recipe. My friend Sascha and I decided to make Erev Rosh Hashana dinner for our parents (and it turns out Marisa came too!). Since it is Rosh Hashana we had to have apple something. Well, we doubled up on the apples for dessert. Sascha made a French Apple Torte that was delicious with my Apple Cider Cinnamon ice cream.
Now, I take no credit for this recipe coming out of my creation. I just followed a recipe from Saveur. Remember? That is the magazine from the last post. Now you can see why I love my father so much for giving me a subscription to this magazine. The ice cream was perfect! Smooth, creamy, apple-y, cinnamon-y and the perfect complement to Sascha's torte.
If you are going to make this recipe, you do need an ice cream maker. When TS and I were registering for gifts some of the "fun" kitchen items for which we registered were an ice cream maker and a malt/shake maker. Highly recommended for your kitchen on our opinion. If you are going to get an ice cream maker I recommend the Cuisinart 2 Quart Ice Cream maker. I have yet to have any complaints with it.
Now you are probably anxious for the recipe. The official recipe is here, but mine adaption is below:
INGREDIENTS
2 cups apple cider
¾ cup sugar
1 stick cinnamon
2 cups 2% milk
2 cups heavy cream
¼ tsp. ground vietnamese cinnamon (you can use regular cinnamon, but I have learned that Vietnamese cinnamon is stronger and more intense)
6 egg yolks
INSTRUCTIONS
1. In a 4 quart saucepan add apple cider, sugar and cinnamon stick and whisk together.
2. Stirring occasionally, bring mixture to boil over medium-high heat.
3. Once mixture has boiled, reduce heat slightly and continue to boil and stir until reduced by at least half (boil for about 25-30 minutes)
4. When reduced, remove pot from heat and take out cinnamon stick.
5. Stir milk and cream into apple cider mixture until smooth.
6. Add ground cinnamon and egg yolks to milk/cider mixture and whisk together until smooth.
7. Put pot back on stove and stirring often, cook mixture until the mixture thickens and will coat the back of a wooden spoon. (about 20-25 minutes).
8. Pour thickened mixture through a strainer and into a medium sized bowl.
9. Refrigerate mixture about 2-3 hours until chilled.
10. Once chilled, pour mixture into your ice cream maker and follow ice cream maker's instructions for making ice cream. (mine I had to pour the mixture into the ice cream maker and turn it on for 20-25 minutes, until the mixture was thick, and slowly moving over the blade, but not so slow that it looked hard. Almost the consistency of partially melted frozen yogurt)
11. Pour mixture from ice cream maker into a bowl and freeze for at least 4 hours.
This ice cream was a hit at Rosh Hashana dinner. However, it would be a great addition to any meal during the year.
L'shana Tova!
Thursday, September 13, 2012
Mexican Cooking Challenge
This blog seems to be an every-now-and-then-when-I-have-time-and-when-I-make-something-good type of blog. So, after a 2 month hiatus, I have another post.
I subscribe (thanks to my loving dad) to Saveur magazine (www.saveur.com). This is a fantastic cooking magazine that provides me with recipes from around the world. What I love about Saveur is that there are not only recipes, but articles describing the region of the world from which the dish came. The most recent issue is all about Mexican cuisine. Now, if you know TS and me, you know that after seafood, we love Mexican, Central American and South American food. It is almost our go-to comfort food. So, this issue of Savuer really piqued our interest. The cover was even so appealing that TS opened it up and started reading it.
After making one dish from this issue last night, I have now decided it is my goal for the winter to not only perfect my pie crust (another story for another time) but to also make each recipe in this magazine. The dish last night was carne asada (steak tacos).
Carne asada was actually a really easy and quick dish to prepare. What I love about making steak like this is the fact that it has to marinate. Marinating means you can do other stuff while your meat gets all yummified. This marinade also allowed me to pull out my blender, which I love but rarely use. I didn't let the steak marinate a long as the recipe called for because it was late when I started and I was hungry. Instead of letting it marinate for an hour, I only let it marinate for 40 mins. It still turned out well.
This meal, after the marinade was made (which only took me about 15 mins to make), only took about 30 mins to cook and put on the table.
Here is the recipe for Carne Asada from Saveur Magazine - somewhat altered by me.
INGREDIENTS
4 cloves garlic, peeled (keep whole)
3 tbsp. canola or vegetable oil
6 canned chipotles in adobo, roughly chopped
1 large white onion, sliced crosswise into ¾"-thick rings
1 small white onion, roughly chopped
2 limes
1 ½ lb. trimmed skirt steak, cut into 4 steaks
Kosher salt and freshly ground black pepper, to taste
1 jalapeño, halved and stemmed
Warm tortillas, for serving
INSTRUCTIONS
1. Heat an 8" skillet over high heat; add garlic, and cook, turning as needed, until charred all over, about 12 minutes.
2. In a blender puree charred garlic, chipotles, small chopped onion, and juice from 2 limes.
3. In a 9" x 13" baking dish add steaks. Pour puree over and toss steaks in marinade to coat; season generously with salt and pepper. Cover with plastic wrap and let marinate at room temperature for 1 hour or in the refrigerator for up to 4 hours.
4. Build a medium-hot fire in a charcoal grill or heat a gas grill to medium hot. (Alternatively, heat a grill pan over medium-high heat -- THIS IS WHAT I DID BECAUSE IT WAS RAINING OUTSIDE) Brush marinade from steaks and transfer to the grill; cook, flipping once, until charred and cooked to desired doneness, about 8 minutes for medium. Transfer steaks to a cutting board, and let rest for 5 minutes. NOTE: I cooked mine on medium-high heat in a grill pan for 6 minutes on each side and it came out medium rare.
5.While steak is resting, place remaining onion and jalapeño on grill (or in grill pan), and cook, turning as needed, until charred and softened, about 10 minutes.
6. Finely chop steaks after resting for 5 mins, and place in medium sized mixing bowl.
7. Finely chop browned/charred onions & jalapeno and add to chopped steak.
8. Toss grilled vegetables and steak in bowl.
9. Serve with tortillas, lime wedges and salsa verde on the side. I did not have time or the ingredients to make salsa verde, but I did have regular red salsa so I served the steak with that.
I ended up serving this meal with black beans and a salad. It was a great meal and I am looking forward to making the next dish from Saveur.
I subscribe (thanks to my loving dad) to Saveur magazine (www.saveur.com). This is a fantastic cooking magazine that provides me with recipes from around the world. What I love about Saveur is that there are not only recipes, but articles describing the region of the world from which the dish came. The most recent issue is all about Mexican cuisine. Now, if you know TS and me, you know that after seafood, we love Mexican, Central American and South American food. It is almost our go-to comfort food. So, this issue of Savuer really piqued our interest. The cover was even so appealing that TS opened it up and started reading it.
After making one dish from this issue last night, I have now decided it is my goal for the winter to not only perfect my pie crust (another story for another time) but to also make each recipe in this magazine. The dish last night was carne asada (steak tacos).
Carne asada was actually a really easy and quick dish to prepare. What I love about making steak like this is the fact that it has to marinate. Marinating means you can do other stuff while your meat gets all yummified. This marinade also allowed me to pull out my blender, which I love but rarely use. I didn't let the steak marinate a long as the recipe called for because it was late when I started and I was hungry. Instead of letting it marinate for an hour, I only let it marinate for 40 mins. It still turned out well.
This meal, after the marinade was made (which only took me about 15 mins to make), only took about 30 mins to cook and put on the table.
Here is the recipe for Carne Asada from Saveur Magazine - somewhat altered by me.
INGREDIENTS
4 cloves garlic, peeled (keep whole)
3 tbsp. canola or vegetable oil
6 canned chipotles in adobo, roughly chopped
1 large white onion, sliced crosswise into ¾"-thick rings
1 small white onion, roughly chopped
2 limes
1 ½ lb. trimmed skirt steak, cut into 4 steaks
Kosher salt and freshly ground black pepper, to taste
1 jalapeño, halved and stemmed
Warm tortillas, for serving
INSTRUCTIONS
1. Heat an 8" skillet over high heat; add garlic, and cook, turning as needed, until charred all over, about 12 minutes.
2. In a blender puree charred garlic, chipotles, small chopped onion, and juice from 2 limes.
3. In a 9" x 13" baking dish add steaks. Pour puree over and toss steaks in marinade to coat; season generously with salt and pepper. Cover with plastic wrap and let marinate at room temperature for 1 hour or in the refrigerator for up to 4 hours.
4. Build a medium-hot fire in a charcoal grill or heat a gas grill to medium hot. (Alternatively, heat a grill pan over medium-high heat -- THIS IS WHAT I DID BECAUSE IT WAS RAINING OUTSIDE) Brush marinade from steaks and transfer to the grill; cook, flipping once, until charred and cooked to desired doneness, about 8 minutes for medium. Transfer steaks to a cutting board, and let rest for 5 minutes. NOTE: I cooked mine on medium-high heat in a grill pan for 6 minutes on each side and it came out medium rare.
5.While steak is resting, place remaining onion and jalapeño on grill (or in grill pan), and cook, turning as needed, until charred and softened, about 10 minutes.
6. Finely chop steaks after resting for 5 mins, and place in medium sized mixing bowl.
7. Finely chop browned/charred onions & jalapeno and add to chopped steak.
8. Toss grilled vegetables and steak in bowl.
9. Serve with tortillas, lime wedges and salsa verde on the side. I did not have time or the ingredients to make salsa verde, but I did have regular red salsa so I served the steak with that.
I ended up serving this meal with black beans and a salad. It was a great meal and I am looking forward to making the next dish from Saveur.
Thursday, July 19, 2012
A Special Gift from My Parents
One thing we do not get in the land of the cold is fresh Gulf of Mexico shrimp. My parents, who live in the land of seafood, decided to be super nice and send TS and me 5 pounds of shrimp. Now one thing for you to understand is TS and I eat shrimp ALL the time. But there is nothing like shrimp from the Gulf of Mexico, so of course we got excited about this delivery. When I heard I was getting shrimp I immediately thought of everything I would do with them. I turned to a Chipotle Grilled Shrimp recipe. I based the recipe off of one I found on www.closetcooking.com.
Chipotle Grilled Shrimp
(for 2 people)
1 lb Jumbo Shrimp
2 chipotle peppers in adobo sauce, finely chopped
2 cloves garlic, minced
1/4 c. finely chopped onion
1 tsp honey
1 tsp adobo sauce (from chipotle in adobo sauce can)
2 Tbsp chopped cilantro
1. Peel the shrimp
 (yes, this is how big the shrimp were that my parents sent me! - YUM! Thank you parents!)
2. In a bowl mix the chopped chipotle peppers, garlic, onion, honey, adobo sauce and cilantro.
3. Add the shrimp and toss.
 (YUM! and YUM! Even TS said the kitchen smelled good after this)
4. Cover the bowl and let marinate for 20 mins.
5. Spray a grill pan and add shrimp and marinade in one layer on the grill pan.
 6. Cook the shrimp for 3 mins on one side and then flip and cook for 2 mins then turn off the heat and let sit in the pan for 2 more mins.
VOILA! You have Chipotle Shrimp!

I served the shrimp over rice with a side of farmers' market steamed broccoli. MMM.
Thank you parents for the shrimp. It was amazing.
Chipotle Grilled Shrimp
(for 2 people)
1 lb Jumbo Shrimp
2 chipotle peppers in adobo sauce, finely chopped
2 cloves garlic, minced
1/4 c. finely chopped onion
1 tsp honey
1 tsp adobo sauce (from chipotle in adobo sauce can)
2 Tbsp chopped cilantro
1. Peel the shrimp

2. In a bowl mix the chopped chipotle peppers, garlic, onion, honey, adobo sauce and cilantro.
3. Add the shrimp and toss.
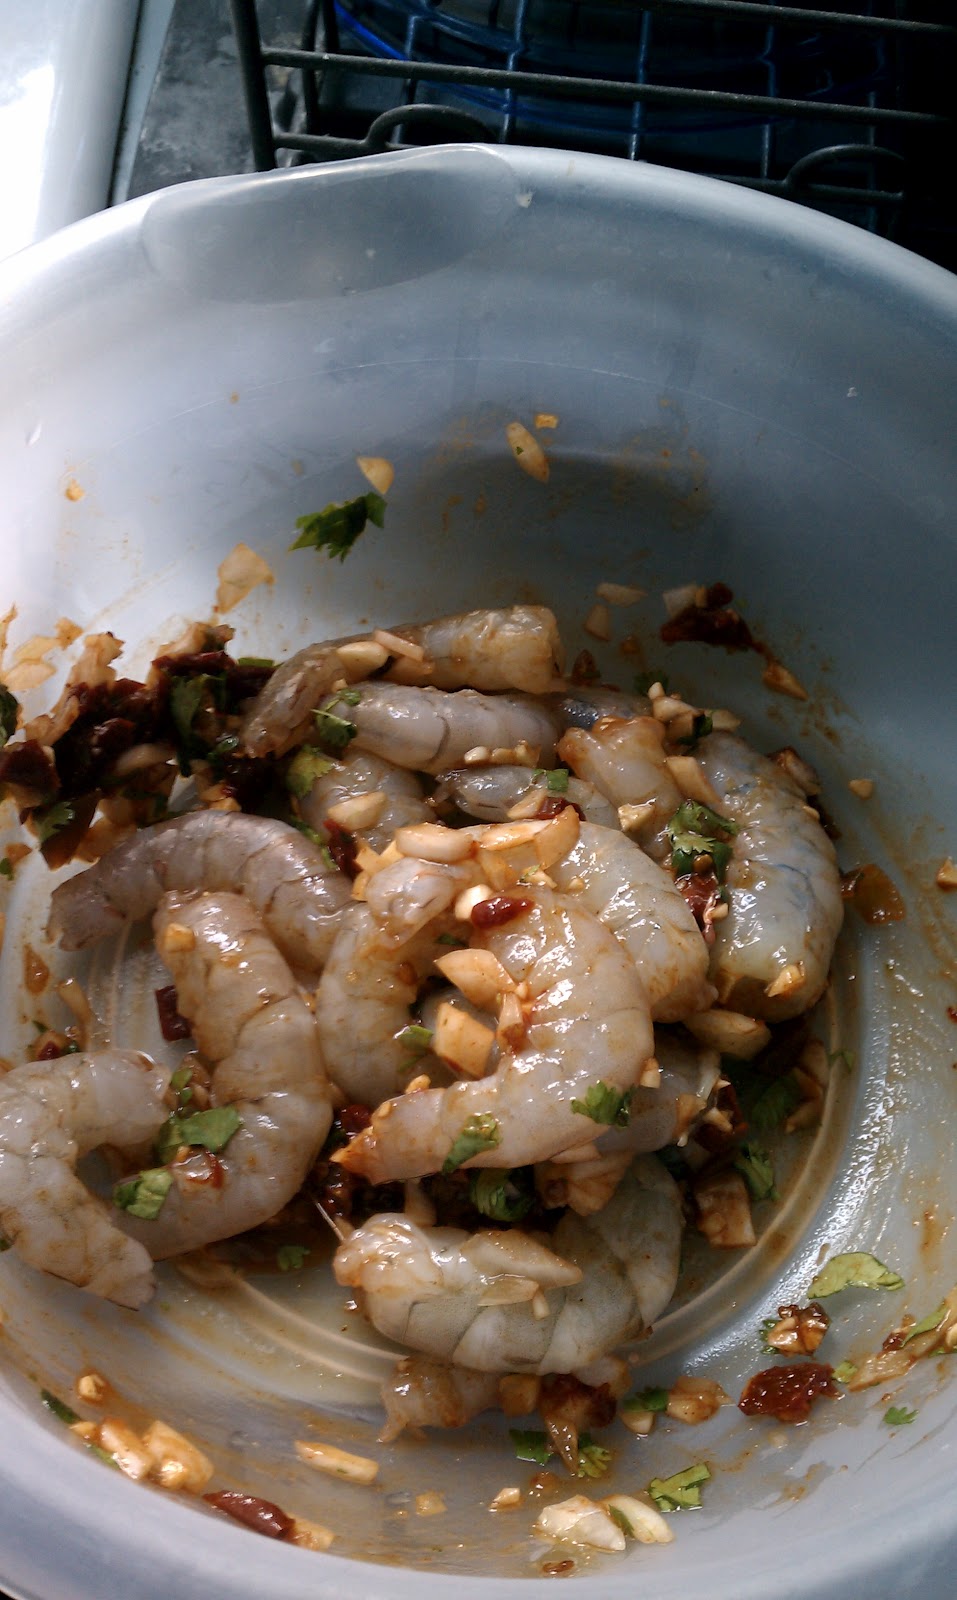
4. Cover the bowl and let marinate for 20 mins.
5. Spray a grill pan and add shrimp and marinade in one layer on the grill pan.

VOILA! You have Chipotle Shrimp!

I served the shrimp over rice with a side of farmers' market steamed broccoli. MMM.
Thank you parents for the shrimp. It was amazing.
Wednesday, April 4, 2012
A Birthday Dinner
Last night was my father-in-law's birthday. Since my mother-in-law was out of town his 3 boys stepped up and invited him to meals. The youngest son bought him lunch, the middle son provided him with dinner #1 and the oldest son provided him with dinner #2. Actually I'm positive that the oldest son did nothing but eat dinner #2 and the wife (aka me) made the dinner. Since I didn't know what time I would be home I turned to an easy dinner that I had been thinking about making for a long time. My take on Shrimp Diablo.
Shrimp Diablo (Laurie's Version) - serves 3
24 shrimp, peeled (I generally make 8-10 shrimp/person for my pasta dishes)
1 tbsp olive oil
1/2 tsp crushed red pepper flakes
1 can tomato paste
1 can diced tomatoes
1 tsp dried basil
1 tsp salt
5 cloves garlic, finely chopped
160g linguini (yes I weigh my pasta in grams)
1. mix together shrimp, 1 tbsp olive oil and 1/2 tsp crushed red pepper flakes in a bowl. Cover and refrigerate for at least 1 hour.
2. Combine, tomato paste, diced tomatoes (including liquid), basil, salt, garlic in a bowl and set aside. (If you want to add some heat to your sauce, add 1/4 tsp crushed red pepper flakes)
3. When you are ready to make dinner, heat the pasta sauce in a pan over low heat for 10 mins and start your pasta going.
4. When water for your pasta is boiling, add the shrimp to the sauce and turn the heat to medium high and cook shrimp until pink and "c" shaped.
5. Cook your pasta
6. Serve shrimp on top of your pasta. ENJOY!
Along with my version of shrimp diablo, we had steamed asparagus and plum cobbler for dessert. MMM. I sure hoped my father-in-law enjoyed his birthday dinner #2 because I know I sure did.
Shrimp Diablo (Laurie's Version) - serves 3
24 shrimp, peeled (I generally make 8-10 shrimp/person for my pasta dishes)
1 tbsp olive oil
1/2 tsp crushed red pepper flakes
1 can tomato paste
1 can diced tomatoes
1 tsp dried basil
1 tsp salt
5 cloves garlic, finely chopped
160g linguini (yes I weigh my pasta in grams)
1. mix together shrimp, 1 tbsp olive oil and 1/2 tsp crushed red pepper flakes in a bowl. Cover and refrigerate for at least 1 hour.
2. Combine, tomato paste, diced tomatoes (including liquid), basil, salt, garlic in a bowl and set aside. (If you want to add some heat to your sauce, add 1/4 tsp crushed red pepper flakes)
3. When you are ready to make dinner, heat the pasta sauce in a pan over low heat for 10 mins and start your pasta going.
4. When water for your pasta is boiling, add the shrimp to the sauce and turn the heat to medium high and cook shrimp until pink and "c" shaped.
5. Cook your pasta
6. Serve shrimp on top of your pasta. ENJOY!
Along with my version of shrimp diablo, we had steamed asparagus and plum cobbler for dessert. MMM. I sure hoped my father-in-law enjoyed his birthday dinner #2 because I know I sure did.
Wednesday, March 21, 2012
Yes I'm Still Here
I know it has been FOREVER since I last blogged, but I did say when I started that this was a real-life blog and things have just gotten in the way of me updating this. I have still been making dinners at home, but nothing too exciting until last night. Which is why I am back. Last night's dinner was Broccoli & Cauliflower Mac & Cheese and a salad. Too me, this dish would be a perfect way to get kids to eat their veggies. :)
Here is the recipe for Broccoli & Cauliflower Macaroni & Cheese:
11 oz chopped broccoli
11 oz chopped cauliflower
1/4 onion, chopped
5 cloves garlic, chopped
1 box macaroni noodles
1 c. chicken broth
2 c. skim milk
1 3/4 c. shredded cheese (I used a cheddar & colby jack mix)
1/4 c. bread crumbs
1 1/2 tbsp olive oil
2 tbsp flour
1/2 tsp cayenne pepper
1 tsp salt
1 tsp dried oregano
1/8 tsp nutmeg
fresh ground black pepper
Preheat oven to 400 and spray 9x13 pan with cooking spray.
1. In a large stock pot, add olive oil, onion and garlic and cook until onion is soft (about 5 mins)
2. While onion mixture is cooking, heat water in a LARGE pot to boil. When boiling add macaroni, chopped broccoli and chopped cauliflower and cook for 6 mins. Then drain.
3. When onion is soft add cayenne pepper, salt, oregano and nutmeg and whisk together, let cook for 1 min. Whisk in flour. Then add milk and chicken stock and whisk together constantly until a gentle simmer begins. Once it begins simmering, add cheese and whisk together constantly for 1 min.
4. Add macaroni mixture to milk mixture and stir until all coated. Then pour into 9x13 pan. Sprinkle breadcrumbs on top of macaroni mixture and then sprinkle black pepper on top. (I personally have a pepper mill and did a few turns of that over the top).
5. Bake for 25 mins. Then let rest for 5-10 mins before serving.
Here is the recipe for Broccoli & Cauliflower Macaroni & Cheese:
11 oz chopped broccoli
11 oz chopped cauliflower
1/4 onion, chopped
5 cloves garlic, chopped
1 box macaroni noodles
1 c. chicken broth
2 c. skim milk
1 3/4 c. shredded cheese (I used a cheddar & colby jack mix)
1/4 c. bread crumbs
1 1/2 tbsp olive oil
2 tbsp flour
1/2 tsp cayenne pepper
1 tsp salt
1 tsp dried oregano
1/8 tsp nutmeg
fresh ground black pepper
Preheat oven to 400 and spray 9x13 pan with cooking spray.
1. In a large stock pot, add olive oil, onion and garlic and cook until onion is soft (about 5 mins)
2. While onion mixture is cooking, heat water in a LARGE pot to boil. When boiling add macaroni, chopped broccoli and chopped cauliflower and cook for 6 mins. Then drain.
3. When onion is soft add cayenne pepper, salt, oregano and nutmeg and whisk together, let cook for 1 min. Whisk in flour. Then add milk and chicken stock and whisk together constantly until a gentle simmer begins. Once it begins simmering, add cheese and whisk together constantly for 1 min.
4. Add macaroni mixture to milk mixture and stir until all coated. Then pour into 9x13 pan. Sprinkle breadcrumbs on top of macaroni mixture and then sprinkle black pepper on top. (I personally have a pepper mill and did a few turns of that over the top).
5. Bake for 25 mins. Then let rest for 5-10 mins before serving.
Monday, December 5, 2011
Winter is Upon Us - And Here are 2 Fish Recipes
As winter has come to Minnesota, there will be more cooking at home. This means, for you my readers, more recipes. Let me start with the Tilapia recipe I made last week.
I love this recipe. It is so easy and quick and healthy. It is my go-to fish recipe whenever I can get fresh tilapia.
Tomato and Onion Tilapia (serves 2)
2 pieces of tilapia
1 tomato, sliced
1/4 onion, sliced
olive oil
salt
pepper
1. coat bottom of a grill pan with 2 tsp olive oil, then line the pan with tomatoes and onions
2. sprinkle a pinch of salt and pepper over the tomatoes and onion
3. place tilapia pieces on top of the tomatoes and onion, cook on medium heat for 4 - 5 mins
4. flip tilapia pieces, bringing some of the tomatoes and onion to the top of the fish. Cook for 4 more mins. If fish is not flaky, flip and cook for 2 mins on each side until fish is flaky and white.
How easy is that?! The fish is good with a side of polenta or potatoes.
Tonight, I made salmon burgers for dinner. I learned how to make these this summer and I keep tweaking the recipe every time. I have yet to make a bad salmon burger. This is a fairly cheap dish to make because canned salmon is just fine. 1 can of salmon is plenty for 2 burgers. Here is the recipe I made tonight:
Salmon Burgers - 12/5/2011 version
1 can salmon
1/2 c. bread crumbs
1/4 c. red onion, finely chopped
1 tsp dried cilantro
1/2 tsp cumin
1 egg
pinch of salt
1. Drain salmon of all liquid and put in small bowl.
2. Add bread crumbs, red onion, cilantro, cumin, egg and salt to salmon and mix together.
3. Form salmon into patties and put in pan coated with cooking spray. Cook for 4 mins on each side.
4. Put salmon on a hamburger bun with some lettuce and tomato and Enjoy!
There you go. 2 easy fish meals. Both meals take less than 15 mins to prepare and cook. I know you guys are always looking for quick easy recipes to make, so there you go. I served the salmon with roasted potatoes and salad.
I know there are people out there who read this blog and are interested in one serving dinners. So, I'll try to make a few dinners this winter that are one serving dinners and post that. If you have any requests for things you want me to make, please feel free to comment as such. I am always willing to figure out a dinner for you.
Here's to good eating!
I love this recipe. It is so easy and quick and healthy. It is my go-to fish recipe whenever I can get fresh tilapia.
Tomato and Onion Tilapia (serves 2)
2 pieces of tilapia
1 tomato, sliced
1/4 onion, sliced
olive oil
salt
pepper
1. coat bottom of a grill pan with 2 tsp olive oil, then line the pan with tomatoes and onions
2. sprinkle a pinch of salt and pepper over the tomatoes and onion
3. place tilapia pieces on top of the tomatoes and onion, cook on medium heat for 4 - 5 mins
4. flip tilapia pieces, bringing some of the tomatoes and onion to the top of the fish. Cook for 4 more mins. If fish is not flaky, flip and cook for 2 mins on each side until fish is flaky and white.
How easy is that?! The fish is good with a side of polenta or potatoes.
Tonight, I made salmon burgers for dinner. I learned how to make these this summer and I keep tweaking the recipe every time. I have yet to make a bad salmon burger. This is a fairly cheap dish to make because canned salmon is just fine. 1 can of salmon is plenty for 2 burgers. Here is the recipe I made tonight:
Salmon Burgers - 12/5/2011 version
1 can salmon
1/2 c. bread crumbs
1/4 c. red onion, finely chopped
1 tsp dried cilantro
1/2 tsp cumin
1 egg
pinch of salt
1. Drain salmon of all liquid and put in small bowl.
2. Add bread crumbs, red onion, cilantro, cumin, egg and salt to salmon and mix together.
3. Form salmon into patties and put in pan coated with cooking spray. Cook for 4 mins on each side.
4. Put salmon on a hamburger bun with some lettuce and tomato and Enjoy!
There you go. 2 easy fish meals. Both meals take less than 15 mins to prepare and cook. I know you guys are always looking for quick easy recipes to make, so there you go. I served the salmon with roasted potatoes and salad.
I know there are people out there who read this blog and are interested in one serving dinners. So, I'll try to make a few dinners this winter that are one serving dinners and post that. If you have any requests for things you want me to make, please feel free to comment as such. I am always willing to figure out a dinner for you.
Here's to good eating!
Wednesday, November 30, 2011
Back At It For A Bit (Part 1)
Well, I'm back to writing, not so much cooking. Last week, with it being Thanksgiving and TS and I were in Omaha with TS's family I didn't do much cooking. However, when I came home on Sunday all I wanted was a good dinner. I made my easy shrimp and pasta on Sunday. Monday, all I wanted was fish, again. I made tilapia. Tuesday, I babysat my neighbor's two boys and ate pizza with them. Tonight I helped TS put prepared food from Kowalski's in the oven. That, in a nutshell is what I have eaten this week. Here are the recipes. The recipes will be posted in a series of posts.
First, I cannot believe I have not put my shrimp and pasta recipe up here. This is my go to, quick, easy dinner that I make when I cannot think of what to make. This recipe evolved from a chicken and pasta recipe I used to make for myself when I was in law school. I have moved on to shrimp, but the base recipe is the same. You make shrimp, pasta and whatever frozen vegetable you have and mix it all together with tomato sauce. Well, that is the base recipe. Here is how I made shrimp and pasta on Monday night:
Shrimp and Pasta
18 frozen shrimp (large)
3 cloves garlic, chopped
1/4 onion, chopped
1/2 green pepper, chopped
1 tsp olive oil
1/8 tsp cayenne pepper
1 tsp basil
1 c. chopped frozen broccoli
1/2 c. tomato sauce (I think I mentioned earlier I use Newman's Organic Tomato Basil)
1 package gnocchi
1. Set the water for the gnocchi to boil
2. while the water is heating up, put the olive oil, garlic, and onion in a large pan and cook for 2 mins stirring constantly
3. Then add the green pepper, cayenne pepper, basil and broccoli to the pan and cook
4. put the gnocchi in the pot, once the water starts to boil, and cook until all the gnocchi floats to the top. Simultaneously, to putting the gnocchi in the pot, put the shrimp into the pan with the broccoli. Cook the shrimp until it is all pink
5. Once the gnocchi has cooked, drain out all the water except about 1/2 c. Add the 1/2 c. of pasta water and the gnocchi to the pan with the shrimp
6. Add pasta sauce to the pan, stir all ingredients together and cook for 2 mins.
7. Serve with fresh parmeasan cheese if you desire.
The whole meal takes no more than 20 mins to cook and it is healthy. It is a staple in my house. Healthy staples are always good. So... Here's go good healthy, quick eating!
First, I cannot believe I have not put my shrimp and pasta recipe up here. This is my go to, quick, easy dinner that I make when I cannot think of what to make. This recipe evolved from a chicken and pasta recipe I used to make for myself when I was in law school. I have moved on to shrimp, but the base recipe is the same. You make shrimp, pasta and whatever frozen vegetable you have and mix it all together with tomato sauce. Well, that is the base recipe. Here is how I made shrimp and pasta on Monday night:
Shrimp and Pasta
18 frozen shrimp (large)
3 cloves garlic, chopped
1/4 onion, chopped
1/2 green pepper, chopped
1 tsp olive oil
1/8 tsp cayenne pepper
1 tsp basil
1 c. chopped frozen broccoli
1/2 c. tomato sauce (I think I mentioned earlier I use Newman's Organic Tomato Basil)
1 package gnocchi
1. Set the water for the gnocchi to boil
2. while the water is heating up, put the olive oil, garlic, and onion in a large pan and cook for 2 mins stirring constantly
3. Then add the green pepper, cayenne pepper, basil and broccoli to the pan and cook
4. put the gnocchi in the pot, once the water starts to boil, and cook until all the gnocchi floats to the top. Simultaneously, to putting the gnocchi in the pot, put the shrimp into the pan with the broccoli. Cook the shrimp until it is all pink
5. Once the gnocchi has cooked, drain out all the water except about 1/2 c. Add the 1/2 c. of pasta water and the gnocchi to the pan with the shrimp
6. Add pasta sauce to the pan, stir all ingredients together and cook for 2 mins.
7. Serve with fresh parmeasan cheese if you desire.
The whole meal takes no more than 20 mins to cook and it is healthy. It is a staple in my house. Healthy staples are always good. So... Here's go good healthy, quick eating!
Sunday, November 20, 2011
Eating Out - Coupon Style and Old Cookbooks
This weekend The Spouse and I decided to use 2 of our online coupons (LivingSocial and CrowdCut - therefore not Groupon so I cannot call them that) for two restaurants we rarely go to: Jax Cafe and Boca Chica. It was a great use of our Friday and Saturday night. Friday night was Jax and Saturday was Boca Chica.
I love the online coupon deals. I usually buy them months before I actually use them. So when I do get around to using them it feels like I have just received a gift card for each restaurant. I think I bought the Jax's coupon back in April and Boca Chica I think I bought a month or so ago. Seeing how I cannot remember, that must mean I bought it more than two weeks ago.
Jax Cafe is an old-time steak restaurant in NE Minneapolis. Some of the best steaks in the area. The steaks are always cooked perfectly and served with a baked potato. What I love about this restaurant is the waitresses understand the meaning of taking your time eating. The waitress first came over and asked us what our drink and appetizer order was. Once we placed that, we took our time enjoying our drinks (wine for me, old fashioned for TS). A little while later, basically right before the appetizer came, the waitress came back and asked for our dinner order. We both got the filet mignon with a side of asparagus. Our appetizer came out (their famous crab rolls) and it was yummy, crab, cheesy goodness. It was delightful. We finished that and then waited, what I felt was the perfect amount of time to savor the appetizer but then get a bit hungry for dinner. Right at that perfect point, our steaks came out - perfectly medium-rare. The asparagus was served with a side of hollandaise sauce. Mmm. We ate our meals and then came the dessert tray. All the desserts looked fantastic, but we were so stuffed from the crab rolls and the steak we decided against dessert. It was a lovely relaxing dinner for a Friday night. I love date night with TS.
Saturday night we ventured through the snow (yes the first accumulating snow of the year) to South St. Paul. We were headed that way to take Ish out to dinner. Since he is in St. Paul we normally stay on the east side. He LOVES (and so do we) Mexican food. Boca Chica is probably one of the better Mexican restaurants in the area. I was smart this time (or thought I would be) and made a reservation for us. Normally, when we go to Boca Chica on a Saturday night we wait an hour for a table. We got to the restaurant and the parking lot was virtually empty; so, no need for a reservation. I know, had I not made the reservation, we would have wished we had one. Anyway, I had the tilapia with mango salsa, TS had enchilladas and Ish had shrimp diablo. Ish really likes spicy food, but the shrimp diablo was so spicy he was crying. He said he loved this food because it warmed him up on a cold day. My tilapia was very enjoyable and I will probably order it again. Needless to say, it was the perfect food for a cold, snowy night.
Overall, a weekend of good dinners. While TS and I went out to dinner both nights, I decided to make breakfast on Saturday. Here is where it gets interesting. If you don't know, I collect old cookbooks. I don't mean my mom's cookbooks, but more along the lines from my grandmother and earlier. I have my grandmother's Settlement Cookbook. It was given to her as a wedding shower gift. It contains just about any recipe you may want, including pancakes. Yes, I made pancakes from a recipe book that is almost 80 years old. See, I have given up buying pancake mix because I am determined to learn how to make the worlds best pancakes from scratch. The pancakes I made this weekend were good, but a little to dense for me. I like my pancakes light and fluffy. Since, the recipe was not up to my standards for great pancakes, I am not going to post it. But one thing I am going to try soon are the Bohemian pancakes. TS's grandfather is of Bohemian descent and I would love to treat him to what the Settlement Cookbook says are "Bohemian" pancakes.
I love cooking! And here is to good cooking!
I love the online coupon deals. I usually buy them months before I actually use them. So when I do get around to using them it feels like I have just received a gift card for each restaurant. I think I bought the Jax's coupon back in April and Boca Chica I think I bought a month or so ago. Seeing how I cannot remember, that must mean I bought it more than two weeks ago.
Jax Cafe is an old-time steak restaurant in NE Minneapolis. Some of the best steaks in the area. The steaks are always cooked perfectly and served with a baked potato. What I love about this restaurant is the waitresses understand the meaning of taking your time eating. The waitress first came over and asked us what our drink and appetizer order was. Once we placed that, we took our time enjoying our drinks (wine for me, old fashioned for TS). A little while later, basically right before the appetizer came, the waitress came back and asked for our dinner order. We both got the filet mignon with a side of asparagus. Our appetizer came out (their famous crab rolls) and it was yummy, crab, cheesy goodness. It was delightful. We finished that and then waited, what I felt was the perfect amount of time to savor the appetizer but then get a bit hungry for dinner. Right at that perfect point, our steaks came out - perfectly medium-rare. The asparagus was served with a side of hollandaise sauce. Mmm. We ate our meals and then came the dessert tray. All the desserts looked fantastic, but we were so stuffed from the crab rolls and the steak we decided against dessert. It was a lovely relaxing dinner for a Friday night. I love date night with TS.
Saturday night we ventured through the snow (yes the first accumulating snow of the year) to South St. Paul. We were headed that way to take Ish out to dinner. Since he is in St. Paul we normally stay on the east side. He LOVES (and so do we) Mexican food. Boca Chica is probably one of the better Mexican restaurants in the area. I was smart this time (or thought I would be) and made a reservation for us. Normally, when we go to Boca Chica on a Saturday night we wait an hour for a table. We got to the restaurant and the parking lot was virtually empty; so, no need for a reservation. I know, had I not made the reservation, we would have wished we had one. Anyway, I had the tilapia with mango salsa, TS had enchilladas and Ish had shrimp diablo. Ish really likes spicy food, but the shrimp diablo was so spicy he was crying. He said he loved this food because it warmed him up on a cold day. My tilapia was very enjoyable and I will probably order it again. Needless to say, it was the perfect food for a cold, snowy night.
Overall, a weekend of good dinners. While TS and I went out to dinner both nights, I decided to make breakfast on Saturday. Here is where it gets interesting. If you don't know, I collect old cookbooks. I don't mean my mom's cookbooks, but more along the lines from my grandmother and earlier. I have my grandmother's Settlement Cookbook. It was given to her as a wedding shower gift. It contains just about any recipe you may want, including pancakes. Yes, I made pancakes from a recipe book that is almost 80 years old. See, I have given up buying pancake mix because I am determined to learn how to make the worlds best pancakes from scratch. The pancakes I made this weekend were good, but a little to dense for me. I like my pancakes light and fluffy. Since, the recipe was not up to my standards for great pancakes, I am not going to post it. But one thing I am going to try soon are the Bohemian pancakes. TS's grandfather is of Bohemian descent and I would love to treat him to what the Settlement Cookbook says are "Bohemian" pancakes.
I love cooking! And here is to good cooking!
Wednesday, November 16, 2011
The Real Life
In real life, people don't have time to blog every day. I lead a real life. I make dinner for friends, spend time with them, then don't have enough time to blog at night. I love making dinner for friends. I do have a policy (which no one actually takes me up on) that if you call me in the morning and tell me you want to come over for dinner, and if I am not doing anything at night, I will make dinner for you. I love cooking for other people.
On Monday night, I was really happy when I got home and TS said Dan was coming over for dinner. It was a relief! I was planning on making meatloaf and I knew I would have more leftovers than I know what to do with if Dan did not come over. Now I just have a little bit of leftover meatloaf. I think this was the first meatloaf I made in years. I actually think the last time I made a meatloaf I lived in an apartment. The recipe I took from Alton Brown, and then did it my way, kind of. It was more, I couldn't find the two types of meat, so I used ground beef and ground pork sausage. Otherwise, I made the recipe found here. Remember, I used GROUND BEEF and GROUND PORK SAUSAGE. Dan and TS both loved the meatloaf. Both went back for seconds. I served it with homemade mashed potatoes and carrots. It was truly an American meal. I even think Dan had a coca-cola with it. All American meal with some all American Vikings v Packers football.
Tuesday night, I had planned for our friends Claire and Andrew to come over for dinner. The last time they came over and I made dinner I made potato tacos (they were amazing), but they were SOOO spicy Andrew was literally sweating and saying "they are so good, I can't stop eating them, but they are SO spicy." It was hilarious. They were troopers and plowed through a new recipe with me. So, last night, they enjoyed another new recipe. This recipe I followed exactly and it makes a lot of food. We enjoyed Shepherd's-Style Rigatoni. Not spicy, like the potato taco's, but it was flavorful. I served it with steamed asparagus. We finished off the meal with an Apple Galette with cinnamon ice cream.
As you can see, when I do not make recipes on my own, I turn to the internet. My favorite sites for recipes are www.foodnetwork.com and www.saveur.com. I actually don't watch the food network. I would rather read a cookbook. But I do enjoy the recipes on the website. Saveur is a magazine which I get every month. Their recipes are usually not for the beginning cook, normally. The recipes are ethnically based and use ingredients which are local to the specific culture. I love challenging recipes, when I have time to cook. See, when you tell me you are coming over for dinner, you will get a good meal.
I love cooking for people and eating with people who enjoy good food. Here's to good eating!
On Monday night, I was really happy when I got home and TS said Dan was coming over for dinner. It was a relief! I was planning on making meatloaf and I knew I would have more leftovers than I know what to do with if Dan did not come over. Now I just have a little bit of leftover meatloaf. I think this was the first meatloaf I made in years. I actually think the last time I made a meatloaf I lived in an apartment. The recipe I took from Alton Brown, and then did it my way, kind of. It was more, I couldn't find the two types of meat, so I used ground beef and ground pork sausage. Otherwise, I made the recipe found here. Remember, I used GROUND BEEF and GROUND PORK SAUSAGE. Dan and TS both loved the meatloaf. Both went back for seconds. I served it with homemade mashed potatoes and carrots. It was truly an American meal. I even think Dan had a coca-cola with it. All American meal with some all American Vikings v Packers football.
Tuesday night, I had planned for our friends Claire and Andrew to come over for dinner. The last time they came over and I made dinner I made potato tacos (they were amazing), but they were SOOO spicy Andrew was literally sweating and saying "they are so good, I can't stop eating them, but they are SO spicy." It was hilarious. They were troopers and plowed through a new recipe with me. So, last night, they enjoyed another new recipe. This recipe I followed exactly and it makes a lot of food. We enjoyed Shepherd's-Style Rigatoni. Not spicy, like the potato taco's, but it was flavorful. I served it with steamed asparagus. We finished off the meal with an Apple Galette with cinnamon ice cream.
As you can see, when I do not make recipes on my own, I turn to the internet. My favorite sites for recipes are www.foodnetwork.com and www.saveur.com. I actually don't watch the food network. I would rather read a cookbook. But I do enjoy the recipes on the website. Saveur is a magazine which I get every month. Their recipes are usually not for the beginning cook, normally. The recipes are ethnically based and use ingredients which are local to the specific culture. I love challenging recipes, when I have time to cook. See, when you tell me you are coming over for dinner, you will get a good meal.
I love cooking for people and eating with people who enjoy good food. Here's to good eating!
Thursday, November 10, 2011
When You Know It is Good
TS has a phrase for when food I make is really good: "You can add this to the rotation." This means I can make it on a regular basis and he will not get bored by it. This also means I could make it once a week and he would be more than happy. Tonight when we finished dinner TS said "You can add this to the rotation." What was he talking about? Broccoli Mac & Cheese.
I have made this before, but this time I got the recipe right. It is cheesy yummy goodness. With the right amount of spice, crispy breadcrumb topping, and adding your vegetable.
Broccoli Mac & Cheese
1/4 onion, finely chopped
4 cups macaroni
16 oz bag frozen, chopped broccoli
6 oz. shredded Italian Cheese mix
1.5 oz (1/3 c. flour)
3 c. skim milk
3/4 c. fat-free half and half
1 tsp olive oil
1/4 tsp red pepper flake
1/8 tsp cayenne pepper
1.5 tsp salt
1/4 tsp fresh ground black pepper
1/2 tsp garlic powder
dash nutmeg
1/2 c. Italian bread crumbs
1. Put pasta on to boil for 7 mins., add broccoli during last 3 mins of cooking
2. Preheat oven to 400 degrees. While pasta is cooking:
-- cook onion in olive oil in a large pot (dutch oven) for 1 min
-- take onion off the heat and add milk, stirring thoroughly
-- in a separate bowl whisk half & half and flour
-- add flour mixture to onion/milk mixture, set back on medium high heat and cook until boils, stirring frequently
-- when boils, cook for 1 more minute, continuously stirring, then remove from heat
-- add cheese, red pepper, black pepper, cayenne pepper, salt, garlic powder and nutmeg to milk mixture
3. Drain pasta/broccoli mixture and add to cheese sauce
4. Pour pasta mixture into 9x13 pan (previously coated with cooking spray)
5. sprinkle bread crumbs on top of pasta mixture
6. bake for 18 mins.
7. After baking, let sit for 5 mins so it can come together.
In this recipe you do end up doing a lot at the same time, so read this recipe completely before you start. Also, have all your ingredients measured and ready to go before you start. This will make things go smoothly. All in all, I think dinner took me about 40 mins to make tonight, with the last 20mins or so with it in the oven.
I love dinners that end with me putting them in the oven. This gives me the chance to clean my kitchen while it is baking. Which means, when dinner is over all I have to do is stick the plates and cups we used into the dishwasher, then I can go about my merry way.
This meal made enough food for us to eat very generous portions for dinner (we were both REALLY hungry) and still have enough for 4 more servings. Leftovers are great.
All in all, this dinner was quite the success! So, here's to good eating!
I have made this before, but this time I got the recipe right. It is cheesy yummy goodness. With the right amount of spice, crispy breadcrumb topping, and adding your vegetable.
Broccoli Mac & Cheese
1/4 onion, finely chopped
4 cups macaroni
16 oz bag frozen, chopped broccoli
6 oz. shredded Italian Cheese mix
1.5 oz (1/3 c. flour)
3 c. skim milk
3/4 c. fat-free half and half
1 tsp olive oil
1/4 tsp red pepper flake
1/8 tsp cayenne pepper
1.5 tsp salt
1/4 tsp fresh ground black pepper
1/2 tsp garlic powder
dash nutmeg
1/2 c. Italian bread crumbs
1. Put pasta on to boil for 7 mins., add broccoli during last 3 mins of cooking
2. Preheat oven to 400 degrees. While pasta is cooking:
-- cook onion in olive oil in a large pot (dutch oven) for 1 min
-- take onion off the heat and add milk, stirring thoroughly
-- in a separate bowl whisk half & half and flour
-- add flour mixture to onion/milk mixture, set back on medium high heat and cook until boils, stirring frequently
-- when boils, cook for 1 more minute, continuously stirring, then remove from heat
-- add cheese, red pepper, black pepper, cayenne pepper, salt, garlic powder and nutmeg to milk mixture
3. Drain pasta/broccoli mixture and add to cheese sauce
4. Pour pasta mixture into 9x13 pan (previously coated with cooking spray)
5. sprinkle bread crumbs on top of pasta mixture
6. bake for 18 mins.
7. After baking, let sit for 5 mins so it can come together.
In this recipe you do end up doing a lot at the same time, so read this recipe completely before you start. Also, have all your ingredients measured and ready to go before you start. This will make things go smoothly. All in all, I think dinner took me about 40 mins to make tonight, with the last 20mins or so with it in the oven.
I love dinners that end with me putting them in the oven. This gives me the chance to clean my kitchen while it is baking. Which means, when dinner is over all I have to do is stick the plates and cups we used into the dishwasher, then I can go about my merry way.
This meal made enough food for us to eat very generous portions for dinner (we were both REALLY hungry) and still have enough for 4 more servings. Leftovers are great.
All in all, this dinner was quite the success! So, here's to good eating!
Monday, November 7, 2011
Back Again
I'm back in the City again after going to my friend Sarah's wedding. She looked so beautiful! All brides look beautiful, but she looked exceptionally beautiful. Congrats Sarah and Ross. I am so happy for you.
Now that I have told you about my weekend, I am back to cooking. Tonight I had some time to actually make a new type of chili. The good thing about chili is you get it all in the pot then you let it cook without doing anything for an hour. That is an hour you can do whatever you want with. Tonight's chili was Chorizo Chipotle Chili.
Chorizo Chipotle Chili
6.5oz Chorizo links, sliced thin
1 lb ground beef
3/4 onion, chopped
5 garlic cloves, chopped
1 can chipotle chilies in adobo sauce (chop 4-6 chilies from can depending on how spicy you want it)
3.5 cups beef broth
3 tbsp tomato paste
1 c. dry red wine
1 tsp dried coriander
1 tsp cumin
2 tsp unsweetened cocoa powder
2 tsp sugar
1 tsp salt
1 tsp dried oregano
1 can pinto beans, drained and rinsed
1 can black beans, drained and rinsed
2 tbsp masa flour
1. In a dutch oven (large stock pot) brown chorizo sausage (cook about 3 mins), take out of pot and set aside
2. brown ground beef in dutch oven, then take out of pot and set aside
3. saute chopped garlic and onion for 3-4 mins
4. add chorizo, ground beef, chopped chipotle chili, cumin, cocoa powder, sugar, salt, coriander, oregano to garlic and onion. stir.
5. add tomato paste, red wine and beef broth to mixture. Stir for 1 min.
6. set on stove until it boils, once boils, turn down the heat and simmer for 1 hr.
7. add masa flour to mixture 1/2 tbsp at a time, then add black beans and pinto beans to mixture then simmer for 30 mins.
We served this with corn bread and shredded Mexican cheese (cheddar cheese would work too). TS says that this was "amazing." This recipe made enough chili for at least 6 servings. I have a feeling I will be making this recipe again later on this winter. Plus, I now have masa flour to make home made tortillas. I'm sure I will be trying that soon! So, here's to good eating!
Now that I have told you about my weekend, I am back to cooking. Tonight I had some time to actually make a new type of chili. The good thing about chili is you get it all in the pot then you let it cook without doing anything for an hour. That is an hour you can do whatever you want with. Tonight's chili was Chorizo Chipotle Chili.
Chorizo Chipotle Chili
6.5oz Chorizo links, sliced thin
1 lb ground beef
3/4 onion, chopped
5 garlic cloves, chopped
1 can chipotle chilies in adobo sauce (chop 4-6 chilies from can depending on how spicy you want it)
3.5 cups beef broth
3 tbsp tomato paste
1 c. dry red wine
1 tsp dried coriander
1 tsp cumin
2 tsp unsweetened cocoa powder
2 tsp sugar
1 tsp salt
1 tsp dried oregano
1 can pinto beans, drained and rinsed
1 can black beans, drained and rinsed
2 tbsp masa flour
1. In a dutch oven (large stock pot) brown chorizo sausage (cook about 3 mins), take out of pot and set aside
2. brown ground beef in dutch oven, then take out of pot and set aside
3. saute chopped garlic and onion for 3-4 mins
4. add chorizo, ground beef, chopped chipotle chili, cumin, cocoa powder, sugar, salt, coriander, oregano to garlic and onion. stir.
5. add tomato paste, red wine and beef broth to mixture. Stir for 1 min.
6. set on stove until it boils, once boils, turn down the heat and simmer for 1 hr.
7. add masa flour to mixture 1/2 tbsp at a time, then add black beans and pinto beans to mixture then simmer for 30 mins.
We served this with corn bread and shredded Mexican cheese (cheddar cheese would work too). TS says that this was "amazing." This recipe made enough chili for at least 6 servings. I have a feeling I will be making this recipe again later on this winter. Plus, I now have masa flour to make home made tortillas. I'm sure I will be trying that soon! So, here's to good eating!
Subscribe to:
Posts (Atom)